Today I replaced my 12V battery in my Roadster, so here is a summary of what it took. With a life span of about 12 months, it's really annoying. It's also annoying to be standing in a parking lot trying to get into a car that cost more than my first house, and have it refuse to unlock for 2-4 minutes. All because of a cheap battery (actually, it's just that the battery is too weak to run the door latch motor).
Tesla wanted to charge about $400 to do it, and it only took a $70 battery and about an hour for a first time attempt. So this should be worth about $300 per hour to you. You're welcome :smile:
First thing is that the manual says to disconnect the charger before raising the car… I have no idea why, and I accidentally forgot to do that myself. It all went fine, but if the manual says to disconnect the charger, I'm not gonna contradict it.
Next, you need a battery. I walked into a local Kawasaki shop, and asked the parts guy for a battery for a 2011 Tesla roadster. He stared at me for a few seconds, and then said he would need a forklift. Payback for my attempt at humor.
I told him I needed a "TZ10" type battery because it had the size and Ah rating I needed. He had two, one was $65 US plus fees, taxes, etc. from "BikeMaster". The other one was $115. Since I didn't know how successful I would be, I chose the lower cost one. Both options were model BTZ10S.
As you will see, the dimensions are the most critical factor.
Here are a few shots of the battery size. The one I took out was an Interstate model FAYTX9. The depth was about 3.5 inches, the width was about 5.75 inches. The height was a little over 4 inches.


The old battery had a reading of 11.58 Volts. Which is why it wouldn't open the door.

Here is the overall view of where the battery is located. It is directly behind the right bumper, and you get to it from the right wheel well.

Here is how you get to it:
Jack up the car, and remove the right front wheel. If you can't figure this out without photos, then just give up here :smile:
At the front of the wheel well is a plastic panel, and there is a felt like cover that goes across the top toward the back of the wheel well. Almost everything is removed using a 10mm socket. There is also a small section in the felt cover that you can open by removing the 4 bolts, which allows access to the headlight. I recommend removing it, as it allows the felt to be more flexible. This is a quick shot of the panel, felt liner, and headlight cover.

There are bolts toward the bottom, and on the side of the plastic cover. Remove them, as well as the nuts that hold on the mud guard. The most difficult part here is getting the one bolt on the bottom of the guard, then peeling off the guard.


Once the bolts are removed, you can simply bend the felt cover back…

which will allow you to pull the plastic panel forward, push it left to get it off the bolts…

And the whole panel comes out.
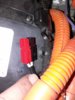
Next, you see the battery. Get your 10mm socket, and remove the NEGATIVE CONNECTION FIRST, that is the black wire. Push the wire up, and out of the way, I wedged it in the felt cover.

You will see that the red wire is very difficult to get to while the battery is still mounted. So next get a smaller socket (I forgot… 3/8"?) and remove the bolts that hold the front bracket on. Then slide the battery out, and while holding it in your hand, you can detached the red wire. You can use the 10mm, or a Philips screwdriver.
The new battery has a small nut that goes into the battery terminal. Here is the old terminal.

Then you feed the screw through the wire connector, and screw it into the nut. Once the red wire is attached, you can reinstall the battery, and attach the bracket. In my case, it was a little tight fit. Once the bracket was put back, the battery is very snug and will not rattle around. Then attach the black wire, and you are ready to put it back together.
Reassembly is done by simply putting the plastic panel back on, and restoring the felt cover and the mud guard. In reverse order.
For reference, this is the box from the new battery, and the old battery.

The whole process took about an hour, including reopening the cover to see if I could find a bolt that was missing.
Hope this helps. And saves you some headache and money.
Tesla wanted to charge about $400 to do it, and it only took a $70 battery and about an hour for a first time attempt. So this should be worth about $300 per hour to you. You're welcome :smile:
First thing is that the manual says to disconnect the charger before raising the car… I have no idea why, and I accidentally forgot to do that myself. It all went fine, but if the manual says to disconnect the charger, I'm not gonna contradict it.
Next, you need a battery. I walked into a local Kawasaki shop, and asked the parts guy for a battery for a 2011 Tesla roadster. He stared at me for a few seconds, and then said he would need a forklift. Payback for my attempt at humor.
I told him I needed a "TZ10" type battery because it had the size and Ah rating I needed. He had two, one was $65 US plus fees, taxes, etc. from "BikeMaster". The other one was $115. Since I didn't know how successful I would be, I chose the lower cost one. Both options were model BTZ10S.
As you will see, the dimensions are the most critical factor.
Here are a few shots of the battery size. The one I took out was an Interstate model FAYTX9. The depth was about 3.5 inches, the width was about 5.75 inches. The height was a little over 4 inches.
The old battery had a reading of 11.58 Volts. Which is why it wouldn't open the door.
Here is the overall view of where the battery is located. It is directly behind the right bumper, and you get to it from the right wheel well.
Here is how you get to it:
Jack up the car, and remove the right front wheel. If you can't figure this out without photos, then just give up here :smile:
At the front of the wheel well is a plastic panel, and there is a felt like cover that goes across the top toward the back of the wheel well. Almost everything is removed using a 10mm socket. There is also a small section in the felt cover that you can open by removing the 4 bolts, which allows access to the headlight. I recommend removing it, as it allows the felt to be more flexible. This is a quick shot of the panel, felt liner, and headlight cover.
There are bolts toward the bottom, and on the side of the plastic cover. Remove them, as well as the nuts that hold on the mud guard. The most difficult part here is getting the one bolt on the bottom of the guard, then peeling off the guard.
Once the bolts are removed, you can simply bend the felt cover back…
which will allow you to pull the plastic panel forward, push it left to get it off the bolts…
And the whole panel comes out.
Next, you see the battery. Get your 10mm socket, and remove the NEGATIVE CONNECTION FIRST, that is the black wire. Push the wire up, and out of the way, I wedged it in the felt cover.
You will see that the red wire is very difficult to get to while the battery is still mounted. So next get a smaller socket (I forgot… 3/8"?) and remove the bolts that hold the front bracket on. Then slide the battery out, and while holding it in your hand, you can detached the red wire. You can use the 10mm, or a Philips screwdriver.
The new battery has a small nut that goes into the battery terminal. Here is the old terminal.
Then you feed the screw through the wire connector, and screw it into the nut. Once the red wire is attached, you can reinstall the battery, and attach the bracket. In my case, it was a little tight fit. Once the bracket was put back, the battery is very snug and will not rattle around. Then attach the black wire, and you are ready to put it back together.
Reassembly is done by simply putting the plastic panel back on, and restoring the felt cover and the mud guard. In reverse order.
For reference, this is the box from the new battery, and the old battery.
The whole process took about an hour, including reopening the cover to see if I could find a bolt that was missing.
Hope this helps. And saves you some headache and money.
Last edited: