


The Roadsters headlights are feeble at best; a function of being so low down and being forced to use halogen bulbs I suspect. They’re also quite hefty power consumers at 60 and 65W.
You’ll need to check your local regulations but it’s technically possible to swap the bulbs for 35W Xenon HID; I’ve seen some stupid Xenon upgrades to SUV’s with poor optics and massive output dazzling oncoming drivers; that’s bad but increasing output in a low sports car with well designed, focused projector headlights seems reasonable; here’s how you might do it… if you did.
What you’ll need:
• A proper low profile trolley jack with a good pad
• 10mm spanner
• A Saturday morning
• Xenon HID replacement kits for Low beam: HB3 and if you wish, high beam: H9B
• Optional: Ramps
Difficulty: medium
Xenon Kits
There are many kits available; I found a couple of kits on Amazon that are suitable and inexpensive (Update) but after a years use I decided to change to a lower temperature kit from DDM with even better results, details below.
I’ve chosen to look at both the main low-beam lights and also the driving main beam lights. The low beam lights make total sense but the high beam needs more thought. Normally, metal-halide lights don’t appreciate being switched on and off, and then on again. It shortens their life. Plus, as even xenon hid bulbs take time to warm up to full brightness they don’t make ideal bulbs for passing or signaling. I drive on longer unlit roads where they get the 20 seconds needed to warm up. Once warmed up they do re-fire to full brightness after being dipped for a few moments as on-coming traffic dictates. Despite not starting at full brightness, good digital ballasts do start the bulbs from cold, in my opinion, as bright as or brighter than normal halogen bulbs. Do consider the cons before upgrading.
Low: 9005(HB3) 4500K (white) http://www.ddmtuning.com/products/101/
High: H9 4500K (white) http://www.ddmtuning.com/products/101/
Update Oct 2010: I've since changed the units to a kit sourced from DDM Tuning as I decided to choose a warmer, less blue colour. The results were significant again. Choose the 9005 option for the headlamps but note that you may need to loosen the three screws inside the mount a couple of turns (no more) to install, then restore them, and the H9 kit for main beam http://www.ddmtuning.com/products/101/
Prep:
To access the headlamp assembly you’ll need to remove the front wheel. You’ll need to lift the car safely and securely; it’s all on you – this is my disclaimer, you’re responsible for your safety and for the health of your car.
I also recommend that to wash the car under the wheel arch to remove any road dirt and grit.
Lastly, I recommend that you remove the roof so that you can access the light switch controls to test the installation without opening the doors whilst the car is jacked up.
Lifting the Roadster
The Roadster has a bonded chassis, as you know, if the chassis is improperly lifted the bonds can be broken; the car will not be repairable economically if that happens – take care.
Tesla Motors have kindly placed labels on the chassis to show where the jacking points are. For easy access I drove the car on to small ramps first so that I could get a very clear view of the jacking points. Refer to the Tesla Owner’s manual for the exact location of the front jacking points and for recommendations on safety. In my opinion this is the part of the job that is difficult, not because it’s hard but because it must be done with care. Amongst other things, consider:
• Level ground
• Handbrake on
• Transmission in park
• Do not venture under the car at any time
• Good lighting
• Tested and secure trolley jack with a good flat rubber covered pad on top
• Anything else to cover my behind!
Once lifted, remove the front wheel:
I recommend that you loosen the wheel nut before the lift and that you rotate the wheel to place the tire valve at the bottom. This ensures that the wheel is returned to the hub in the same, balanced place.
After removing the wheel take a moment to check around the suspension and wiring for the wheel sensors, look for any damaged cables or pipes. I just sat for ten minutes marveling at the technology; it is a joy to behold. Note the centre of the brake disk/hub is designed to take a drive shaft; that’s for the upcoming 4-wheel drive model. (Kidding!)
Access panel
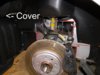
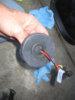
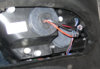
The headlight assembly is behind an access panel secured by two 10mm bolts. Remove these to access the headlight assembly.
On the rear of the assembly you’ll find three round rubber covers, two easily visible & one on the inside side of the assembly. You only need access the first two easily reached ones.
Low beam
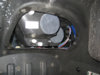
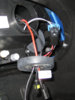
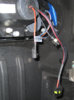
The outside, first cover, covers the low beam HB3 lamp. After removing the cover and twisting the bulb to release it, you’ll see that the connector that goes into the bulb can be released easily by lifting the tab. You’ll also see that the connector to the bulb can be transferred to the Xenon HID control unit; it’s a perfect fit; no wires to cut, not adapters just plug-and-play; thanks TM. Tuck the connector into the headlight unit out of the way and run the cable down from the headlight assembly to the controller.
Install the Xenon bulb in place of the halogen, the bulb is designed to locate exactly where the filament was to ensure that the beam pattern is unaffected. When removing the old bulb, note how far you must rotate it, when you install the new bulb you should expect to rotate it the same, again this ensures that the xenon arc matches the position of the old filament to keep the beam pattern crisp. Take great care not to touch the glass on the bulb… at all!
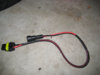
Connect the high tension (80V) cables from the bulb to the controller and perform a quick test. Note: Don’t get in the car and do take care opening the door whilst it’s jacked up. If you’d removed the roof it’d be easy right now.
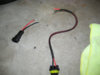
Run the high tension wires from the bulb along with the low tension wires to the controller down and out of the headlamp unit. Restore the rubber cover and use waterproof tape to seal the rubber down. You should ensure a good seal to prevent excess moisture from getting in and clouding up the front lens… unless, like most of us it seems, it’s too late and you already do get moisture on the inside of the lens. Update: over time I've noticed that the cloudiness has gone, possibly due to a slight opening allowing the headlamps to dry, who knows.
Locating the controller
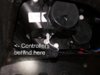
At the outside of the headlamp assembly there is space with plenty of room and a flat surface to locate the controller. The double-sided tape pads in the kit work perfectly. Try not to cover the Garmin GPS receiver at the front.
High beam
If you choose to upgrade the high beam, the process is the same except that the connector is different so you’ll need to connect the low tension cables that went to the bulb to the wiring adapter in the kit first and tape over to protect.
Turn signal and side/marker light
I did look at changing the marker lights and turn signal for LED’s however, neither use enough power and trigger the cars bulb check feature, which is a shame.
Testing
Comparing the beam pattern I found no change and observing the car in the dark from a distance I found no change in the off-axis light output, in fact I felt that it was tighter; a function of the light source being smaller. This check is important to ensure that the bulbs are located properly and don’t affect other drivers.
The upgrade brings a modest increase in performance, I find it easier to see the edges of the road at night, in the rain; I feel considerably safer. The upgrade doesn’t produce brilliant results; for that we’d need to upgrade to brighter bulbs and better optics and with that high output would, I feel need self-leveling beam technology. At this level, with the Roadster being so low I don’t see a situation where a fully loaded car results in the front end being lifted and dazzling oncoming drivers; a serious concern.
Completion
Restore the wheel arch access plate, restore the wheel taking care to locate the valve down to ensure the proper balance and torque the bolts to the factory setting.
Removal
As you’ve not cut any cables or fittings the removal is the reverse of installation.
You’ll need to check your local regulations but it’s technically possible to swap the bulbs for 35W Xenon HID; I’ve seen some stupid Xenon upgrades to SUV’s with poor optics and massive output dazzling oncoming drivers; that’s bad but increasing output in a low sports car with well designed, focused projector headlights seems reasonable; here’s how you might do it… if you did.
What you’ll need:
• A proper low profile trolley jack with a good pad
• 10mm spanner
• A Saturday morning
• Xenon HID replacement kits for Low beam: HB3 and if you wish, high beam: H9B
• Optional: Ramps
Difficulty: medium
Xenon Kits
There are many kits available; I found a couple of kits on Amazon that are suitable and inexpensive (Update) but after a years use I decided to change to a lower temperature kit from DDM with even better results, details below.
I’ve chosen to look at both the main low-beam lights and also the driving main beam lights. The low beam lights make total sense but the high beam needs more thought. Normally, metal-halide lights don’t appreciate being switched on and off, and then on again. It shortens their life. Plus, as even xenon hid bulbs take time to warm up to full brightness they don’t make ideal bulbs for passing or signaling. I drive on longer unlit roads where they get the 20 seconds needed to warm up. Once warmed up they do re-fire to full brightness after being dipped for a few moments as on-coming traffic dictates. Despite not starting at full brightness, good digital ballasts do start the bulbs from cold, in my opinion, as bright as or brighter than normal halogen bulbs. Do consider the cons before upgrading.
Low: 9005(HB3) 4500K (white) http://www.ddmtuning.com/products/101/
High: H9 4500K (white) http://www.ddmtuning.com/products/101/
Update Oct 2010: I've since changed the units to a kit sourced from DDM Tuning as I decided to choose a warmer, less blue colour. The results were significant again. Choose the 9005 option for the headlamps but note that you may need to loosen the three screws inside the mount a couple of turns (no more) to install, then restore them, and the H9 kit for main beam http://www.ddmtuning.com/products/101/
Prep:
To access the headlamp assembly you’ll need to remove the front wheel. You’ll need to lift the car safely and securely; it’s all on you – this is my disclaimer, you’re responsible for your safety and for the health of your car.
I also recommend that to wash the car under the wheel arch to remove any road dirt and grit.
Lastly, I recommend that you remove the roof so that you can access the light switch controls to test the installation without opening the doors whilst the car is jacked up.
Lifting the Roadster
The Roadster has a bonded chassis, as you know, if the chassis is improperly lifted the bonds can be broken; the car will not be repairable economically if that happens – take care.
Tesla Motors have kindly placed labels on the chassis to show where the jacking points are. For easy access I drove the car on to small ramps first so that I could get a very clear view of the jacking points. Refer to the Tesla Owner’s manual for the exact location of the front jacking points and for recommendations on safety. In my opinion this is the part of the job that is difficult, not because it’s hard but because it must be done with care. Amongst other things, consider:
• Level ground
• Handbrake on
• Transmission in park
• Do not venture under the car at any time
• Good lighting
• Tested and secure trolley jack with a good flat rubber covered pad on top
• Anything else to cover my behind!
Once lifted, remove the front wheel:
I recommend that you loosen the wheel nut before the lift and that you rotate the wheel to place the tire valve at the bottom. This ensures that the wheel is returned to the hub in the same, balanced place.
After removing the wheel take a moment to check around the suspension and wiring for the wheel sensors, look for any damaged cables or pipes. I just sat for ten minutes marveling at the technology; it is a joy to behold. Note the centre of the brake disk/hub is designed to take a drive shaft; that’s for the upcoming 4-wheel drive model. (Kidding!)
Access panel
The headlight assembly is behind an access panel secured by two 10mm bolts. Remove these to access the headlight assembly.
On the rear of the assembly you’ll find three round rubber covers, two easily visible & one on the inside side of the assembly. You only need access the first two easily reached ones.
Low beam
The outside, first cover, covers the low beam HB3 lamp. After removing the cover and twisting the bulb to release it, you’ll see that the connector that goes into the bulb can be released easily by lifting the tab. You’ll also see that the connector to the bulb can be transferred to the Xenon HID control unit; it’s a perfect fit; no wires to cut, not adapters just plug-and-play; thanks TM. Tuck the connector into the headlight unit out of the way and run the cable down from the headlight assembly to the controller.
Install the Xenon bulb in place of the halogen, the bulb is designed to locate exactly where the filament was to ensure that the beam pattern is unaffected. When removing the old bulb, note how far you must rotate it, when you install the new bulb you should expect to rotate it the same, again this ensures that the xenon arc matches the position of the old filament to keep the beam pattern crisp. Take great care not to touch the glass on the bulb… at all!
Connect the high tension (80V) cables from the bulb to the controller and perform a quick test. Note: Don’t get in the car and do take care opening the door whilst it’s jacked up. If you’d removed the roof it’d be easy right now.
Run the high tension wires from the bulb along with the low tension wires to the controller down and out of the headlamp unit. Restore the rubber cover and use waterproof tape to seal the rubber down. You should ensure a good seal to prevent excess moisture from getting in and clouding up the front lens… unless, like most of us it seems, it’s too late and you already do get moisture on the inside of the lens. Update: over time I've noticed that the cloudiness has gone, possibly due to a slight opening allowing the headlamps to dry, who knows.
Locating the controller
At the outside of the headlamp assembly there is space with plenty of room and a flat surface to locate the controller. The double-sided tape pads in the kit work perfectly. Try not to cover the Garmin GPS receiver at the front.
High beam
If you choose to upgrade the high beam, the process is the same except that the connector is different so you’ll need to connect the low tension cables that went to the bulb to the wiring adapter in the kit first and tape over to protect.
Turn signal and side/marker light
I did look at changing the marker lights and turn signal for LED’s however, neither use enough power and trigger the cars bulb check feature, which is a shame.
Testing
Comparing the beam pattern I found no change and observing the car in the dark from a distance I found no change in the off-axis light output, in fact I felt that it was tighter; a function of the light source being smaller. This check is important to ensure that the bulbs are located properly and don’t affect other drivers.
The upgrade brings a modest increase in performance, I find it easier to see the edges of the road at night, in the rain; I feel considerably safer. The upgrade doesn’t produce brilliant results; for that we’d need to upgrade to brighter bulbs and better optics and with that high output would, I feel need self-leveling beam technology. At this level, with the Roadster being so low I don’t see a situation where a fully loaded car results in the front end being lifted and dazzling oncoming drivers; a serious concern.
Completion
Restore the wheel arch access plate, restore the wheel taking care to locate the valve down to ensure the proper balance and torque the bolts to the factory setting.
Removal
As you’ve not cut any cables or fittings the removal is the reverse of installation.
Attachments
Last edited:

")