Welcome to Tesla Motors Club
Discuss Tesla's Model S, Model 3, Model X, Model Y, Cybertruck, Roadster and More.
Register
Install the app
How to install the app on iOS
You can install our site as a web app on your iOS device by utilizing the Add to Home Screen feature in Safari. Please see this thread for more details on this.
Note: This feature may not be available in some browsers.
-
Want to remove ads? Register an account and login to see fewer ads, and become a Supporting Member to remove almost all ads.
You are using an out of date browser. It may not display this or other websites correctly.
You should upgrade or use an alternative browser.
You should upgrade or use an alternative browser.
MarcG
Active Member
Just to RE-UP on this, you cannot buy a premade Tesla diag cable and use it on the refresh cars, unless you have a device that is wired read can messages from OBD-II pins 12,13. If you use one of the existing cables, you will not have access to the Vehicle bus, which has arguably the most important/useful data. I have had success re-pinning a premade cable from Maxwell (they sent me some pre-crimped ones by mistake), but I don't recommend this, as the connector is troublesome to deal with.
Also, as a followup, I am finally posting info on the pins you want to crimp to get data on refresh cars. I'll add links to the Maxwell Auto cable datasheets as a reference for the sumitomo connector.
Note: (Pins 18 and 19 on the sumitomo are also populated on refresh and likely relate to the redundancy (party) bus, but there isn't much useful data on that bus and this is unconfirmed.)
View attachment 697205
Hi @rhuber I finally received the Maxwell self-crimp cable and currently working on crimping it to the ODBII female connector (which I also got from Maxwell instead of Amazon, which I'm trying to avoid like the plague).
Before I do anything stupid, can you please confirm I'm doing this right? Following the PDF of the self-crimp cable, which has this pinout associated with their ribbon cable:
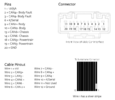
I put together this pinout association between the Tesla connector and the Maxwell ribbon cable in order they listed above:
Listed in order of the Maxwell cable ribbon, I added the corresponding ODBII connector pinout:
Does this look right to you? Thanks!
Last edited:
Yep, that looks correct to me!Hi @rhuber I finally received the Maxwell self-crimp cable and currently working on crimping it to the ODBII female connector (which I also got from Maxwell instead of Amazon, which I'm trying to avoid like the plague).
Before I do anything stupid, can you please confirm I'm doing this right? Following the PDF of the self-crimp cable, which has this pinout associated with their ribbon cable:
View attachment 699763
I put together this pinout association between the Tesla connector and the Maxwell ribbon cable in order they listed above:
View attachment 699766
Listed in order of the Maxwell cable ribbon, I added the corresponding ODBII connector pinout:
View attachment 699794
Does this look right to you? Thanks!
MarcG
Active Member
Thanks for confirming! Let the crimping beginYep, that looks correct to me!
Hi @rhuber I finally received the Maxwell self-crimp cable and currently working on crimping it to the ODBII female connector (which I also got from Maxwell instead of Amazon, which I'm trying to avoid like the plague).
Before I do anything stupid, can you please confirm I'm doing this right? Following the PDF of the self-crimp cable, which has this pinout associated with their ribbon cable:
View attachment 699763
I put together this pinout association between the Tesla connector and the Maxwell ribbon cable in order they listed above:
View attachment 699766
Listed in order of the Maxwell cable ribbon, I added the corresponding ODBII connector pinout:
View attachment 699794
Does this look right to you? Thanks!
We really need to put pressure on Maxwell (or even the Amazon sellers) to update with the new 2021 pinout, especially now that we know that this harness works across all 2021 Tesla models.
I had to to travel to CT this weekend (and then race a hurricane back) but I made sure to rush out your order before I left
MarcG
Active Member
Highly appreciate that Josh! I think it’s arriving tomorrow. Of course, my Plaid isn’t even in my garage yetI had to to travel to CT this weekend (and then race a hurricane back) but I made sure to rush out your order before I left
MarcG
Active Member
While there is no pre-made diag cable for the refresh S/X, for those interested in making their own cables, I thought I'd share steps & photos of the way I built mine:
1. Buy the Maxwell CAN diagnostic cable bundle (or get the individual cable by itself and a female ODBII connector of your choice, such a this one)
2. Follow along the connector pinout diagrams and ribbon cable's wire numbers from my post above
3. [important!] If your ODBII connector has a strain relief sleeve, fold the to-be-crimped end of the ribbon into a small tube and insert the sleeve over it before moving the to the next step
4. Crimp the 6 wires needed to the provided ODBII connector pins, the end result of which should look like this:
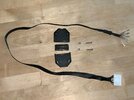
5. Using an ohmmeter, check that the pins you just crimped are making a good electrical pathway (0 ohms) to the correct slot in the Tesla connector
6. Insert the pins in the correct slot numbers of the OBDII connector:
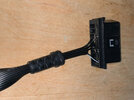
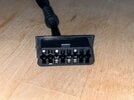
7. Wrap the inside portion of the folded ribbon cable with electric tape so you don't put stress on the pins if the cable is being pulled on:
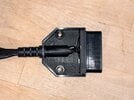
8. Put the ODBII connector back together:

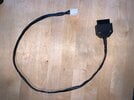
9. [optional] Wrap the entire ribbon cable in electric tape for a more compact look/usage:
Hope this helps! Now, if Tesla would just build my car already
1. Buy the Maxwell CAN diagnostic cable bundle (or get the individual cable by itself and a female ODBII connector of your choice, such a this one)
2. Follow along the connector pinout diagrams and ribbon cable's wire numbers from my post above
3. [important!] If your ODBII connector has a strain relief sleeve, fold the to-be-crimped end of the ribbon into a small tube and insert the sleeve over it before moving the to the next step
4. Crimp the 6 wires needed to the provided ODBII connector pins, the end result of which should look like this:

5. Using an ohmmeter, check that the pins you just crimped are making a good electrical pathway (0 ohms) to the correct slot in the Tesla connector
6. Insert the pins in the correct slot numbers of the OBDII connector:


7. Wrap the inside portion of the folded ribbon cable with electric tape so you don't put stress on the pins if the cable is being pulled on:

8. Put the ODBII connector back together:

9. [optional] Wrap the entire ribbon cable in electric tape for a more compact look/usage:

Hope this helps! Now, if Tesla would just build my car already
Last edited:
Excellent write up!While there is no pre-made diag cable for the refresh S/X, for those interested in making their own cables, I thought I'd share steps & photos of the way I built mine:
1. Buy the Maxwell CAN diagnostic cable bundle (or get the individual cable by itself and a female ODBII connector of your choice, such a this one)
2. Follow along the connector pinout diagrams and ribbon cable's wire numbers from my post above
3. [important!] If your ODBII connector has a strain relief sleeve, fold the to-be-crimped end of the ribbon into a small tube and insert the sleeve over it before moving the to the next step
4. Crimp the 6 wires needed to the provided ODBII connector pins, the end result of which should look like this:
View attachment 700231
5. Using an ohmmeter, check that the pins you just crimped are making a good electrical pathway (0 ohms) to the correct slot in the Tesla connector
6. Insert the pins in the correct slot numbers of the OBDII connector:
View attachment 700232
View attachment 700233
7. Wrap the inside portion of the folded ribbon cable with electric tape so you don't put stress on the pins if the cable is being pulled on:
View attachment 700234
8. Put the ODBII connector back together:
View attachment 700235
9. [optional] Wrap the entire ribbon cable in electric tape for a more compact look/usage:
View attachment 700236
Hope this helps! Now, if Tesla would just build my car already
MarcG
Active Member
Thanks! Good idea on the zip ties, I’ll do that too.Excellent write up! View attachment 700260Just one suggestion to add, I put a pair of zip ties around the ribbon inside the connector housing and purposefully left a good amount of slack for even more strain relief.
Hi everyone, I am a bit late to this thread. I found this when trying to see how the M3 to MS stalk modification was going. I have my refresh on order.
In my previous 3 MS's, I used the OBD port in the driver's footwell for 12V access to power my radar detector. These have all been continuous power on.
Two questions:
1) where is the OBD on the MS refresh?
2) Is the 12V continuous, or only when the car is powered up? If the latter, I can deal with it.
MarcG
Active Member
1) It’s under the wireless charger pad, which you have to lift by the area pointed out by the arrow in the first photo below. Then look for a little trap door just below the 17” screen. The ODBII port is attached to that door, in the area behind the red circle highlighted in the second photo .Hi everyone, I am a bit late to this thread. I found this when trying to see how the M3 to MS stalk modification was going. I have my refresh on order.
In my previous 3 MS's, I used the OBD port in the driver's footwell for 12V access to power my radar detector. These have all been continuous power on.
Two questions:
1) where is the OBD on the MS refresh?
2) Is the 12V continuous, or only when the car is powered up? If the latter, I can deal with it.
2) My understanding is it’s only when the car is powered up (see previous post on this).
Thank you. Awesome find. Almost perfect location too. I just need to get the a cable to this from the driver's footwell to power my main radar control unit.1) It’s under the wireless charger pad, which you have to lift by the area pointed out by the arrow in the first photo below. Then look for a little trap door just below the 17” screen. The ODBII port is attached to that door, in the area behind the red circle highlighted in the second photo .
2) My understanding is it’s only when the car is powered up (see previous post on this).
View attachment 706963
View attachment 706964
Rather than making my own cable (which I guess I could do easily enough), I wonder if something like this would be sufficient if all I need is a 12V supply:
MarcG
Active Member
Yes, but you'll still need the "old" Maxwell adapter to go from the Tesla connector to ODBII so you can plug that cable you linked to it. It should supply 12V with the standard pins.Thank you. Awesome find. Almost perfect location too. I just need to get the a cable to this from the driver's footwell to power my main radar control unit.
Rather than making my own cable (which I guess I could do easily enough), I wonder if something like this would be sufficient if all I need is a 12V supply:
Which made me go to my car and look for a 12V "cigarette lighter" plug. It doesn't exist in the refresh model S?!?
Slide the cup holder back and look down the deep cubby hole, it's facing forward along with a couple USB-C ports. My radar detector is plugged into there for now until I get around to hard wiring it.Which made me go to my car and look for a 12V "cigarette lighter" plug. It doesn't exist in the refresh model S?!?
MarcG
Active Member
Ha, it did not occur to me that this black square cover was hiding the 12V port.. and that I had to push on it to reveal it. Genius! Thanks @DukeofURLSlide the cup holder back and look down the deep cubby hole, it's facing forward along with a couple USB-C ports. My radar detector is plugged into there for now until I get around to hard wiring it.

Let me make sure I understand correctly: OBD2 will not plug into that port, but the Maxwell one will? If that is the case, then I only need the Maxwell cable, and can access power from the correct wires (1 and 12) coming out of that, correct?Yes, but you'll still need the "old" Maxwell adapter to go from the Tesla connector to ODBII so you can plug that cable you linked to it. It should supply 12V with the standard pins.
Which made me go to my car and look for a 12V "cigarette lighter" plug. It doesn't exist in the refresh model S?!?
MarcG
Active Member
The port found in all Tesla vehicles is NOT the standard ODBII port that most other manufacturers include, so you must buy an adapter cable that connects to the Tesla-specific port. Whether the adapter's other end is a standard ODBII port or something else is up to you.Let me make sure I understand correctly: OBD2 will not plug into that port, but the Maxwell one will? If that is the case, then I only need the Maxwell cable, and can access power from the correct wires (1 and 12) coming out of that, correct?
Maxwell's pre-crimped adapter cable will give you power on the ODBII pins shown above, but the CAN pairs are different in the refreshed models (S & presumably X).
Ok, so for the purposes of getting power, I can just use the Maxwell port.The port found in all Tesla vehicles is NOT the standard ODBII port that most other manufacturers include, so you must buy an adapter cable that connects to the Tesla-specific port. Whether the adapter's other end is a standard ODBII port or something else is up to you.
Maxwell's pre-crimped adapter cable will give you power on the ODBII pins shown above, but the CAN pairs are different in the refreshed models (S & presumably X).
Of note, I have a 2018 Model S, and use a standard OBD2 connector to connect to it.
MarcG
Active Member
Interesting, my 2014 Model S P85D did not have a standard port. Neither did my 2019 Model 3 Perf.Ok, so for the purposes of getting power, I can just use the Maxwell port.
Of note, I have a 2018 Model S, and use a standard OBD2 connector to connect to it.
hybridbear
Active Member
Don’t you need an adapter cable from the propriety Tesla port to the standard OBDII port?Ok, so for the purposes of getting power, I can just use the Maxwell port.
Of note, I have a 2018 Model S, and use a standard OBD2 connector to connect to it.
Similar threads
- Replies
- 49
- Views
- 26K


