Welcome to Tesla Motors Club
Discuss Tesla's Model S, Model 3, Model X, Model Y, Cybertruck, Roadster and More.
Register

2014 P85d High Voltage Failure

This site may earn commission on affiliate links.
Heat builds up in the pack and rises to the front elevated area, rain comes off the windshield and cools the outside of it causing a greenhouse environment inside. The rear vents tend to get covered in crud which doesn't help.
 
Heat builds up in the pack and rises to the front elevated area, rain comes off the windshield and cools the outside of it causing a greenhouse environment inside. The rear vents tend to get covered in crud which doesn't help.
So a fully developed design would have a way to mitigate this moisture effect... Other OEM's EV packs have various solutions like ventilation and desiccant cartridges that are serviceable. Howard started a separate discussion on the topic here: Condensation Failure Inside Battery Pack (BMS_F107 code)
 
So a fully developed design would have a way to mitigate this moisture effect... Other OEM's EV packs have various solutions like ventilation and desiccant cartridges that are serviceable. Howard started a separate discussion on the topic here: Condensation Failure Inside Battery Pack (BMS_F107 code)
Could be as simple as dropping the pack at 5yrs and cleaning the vents or factory sealed circuit boards. History will tell....
 
I am certainly never going to open the pack for anything preventative. This is going to be 40+ hours of (my) labor by the time it is done not counting research and part of the methodical approach is to do everything I can to make sure I don't have to do it again. If I start to get funny codes or see a point of water ingress like a broken umbrella valve, sure, but if I put a desiccant bag in the pack and there are no signs of issues in 5 years, I'll keep driving and the bag stays there in whatever condition until something goes wrong!
 
I am certainly never going to open the pack for anything preventative. This is going to be 40+ hours of (my) labor by the time it is done not counting research and part of the methodical approach is to do everything I can to make sure I don't have to do it again. If I start to get funny codes or see a point of water ingress like a broken umbrella valve, sure, but if I put a desiccant bag in the pack and there are no signs of issues in 5 years, I'll keep driving and the bag stays there in whatever condition until something goes wrong!
The number of hours you've spent is indicative of the financial realities of a non DIY repair of the 029/018 alert issue. Most 3rd party professionals charge $200/hour labor. One 3rd party professional invoice I saw charged 30 hours labor to drop, open, repair, reassemble, and install owner's existing pack.

So, that's $6k in labor, to start.
 
  • Like
Reactions: cwerdna
The number of hours you've spent is indicative of the financial realities of a non DIY repair of the 029/018 alert issue. Most 3rd party professionals charge $200/hour labor. One 3rd party professional invoice I saw charged 30 hours labor to drop, open, repair, reassemble, and install owner's existing pack.

So, that's $6k in labor, to start.

Yep. I calculate similar. Maybe with experience + custom tools go faster.

Really a shame so much of repair cost is tied up in the stupid lid.

Would be a lot less labor if can source a new lid. Tesla won’t sell one. Doing some poking at auto body panel manufacturers.

@mr_hyde measured 0.75mm thick. ~100” x 57”. Like 100 bolt holes and pressed rail patterns where bolt goes. Surface treated with something. Then there is the hump which is more complex but easier to non destructively remove and reuse.

Ideal improvement is dev a Chevy bolt style rubber gasket + bolt spacers but need more rigorous testing : does existing Tesla bolt spacing provide sufficient seal? Longevity? Front end mating points to the hump etc.
 
Last edited:
  • Like
Reactions: NV Ray
My 40 hours could be cut down to 10 with some practice and a full shop IF, and only if, a new lid could be sourced and the original one could be removed like the module savagers do - strap to a forklift and yank! I think I could mange the old lids at 15 hours so at $200/hr, that lid needs to cost less than $3k to make sense which I'm sure it would if purchased in volume. I'm curious if 057 and Recell reuse the lids or have a source for parts?

The other thing to consider is the quality of the seal with a used lid going on. Mine is pretty okay now, but not great, and if I had to do this again, I think I would start seeing tears from metal fatigue which is obviously very bad. I would pay several hundred dollars to have a new lid show up at the garage door this time and would probably need to source a lid first if I ever did this again.
 
Tuesday update - finished cleaning the sealant off the lid and pounded it flat using a hammer and a thick chunk of iron from the sheet metal brake (used in race car fabrication). I'm pretty confident the lid will go on okay now. It also occurred to me that reinstalling the lid is similar to reinstalling the battery in that I will use bolts with the heads cut off at each corner as guide pins. That should allow two people to set the lid on the beads of sealer with good precision. Tomorrow I will do a final inspection of all the BMBs with the jewelry visor to make sure I'm not missing any corrosion and then the modules can start going back in the pack.

I'm leaving on vacation for a few weeks starting Saturday and this project won't be done by then. I still need a new pyro-fuse because the original one is the old wire/ceramic version that I read do fatigue over time and can fail randomly. Since Tesla won't sell me the current one, my choices are a used one from a salvager on ebay or a new one shipped from China. The one from China almost certainly fell off the back of a truck on the way to the dock heading to the US but I doubt it is a counterfeit knock-off because there isn't enough volume on these to tool up a counterfeit operation. I still need to source some other things like umbrella valves and a fuse cover that Tesla won't sell me because I've been naughty fixing my own car. If anyone is Seattle isn't blacklisted from buying OTC parts and would like to help me out, I'll pick up and venmo or bring cash as long as we can do it by Friday. Silly Tesla...
 
More work completed in the last two days. Every BMB has been removed and inspected. I found some corrosion on the BMB for #9 which means modules 7,8,9,10 and 11 all have some corrosion on the boards. Only 8 failed but the rest were just waiting. Tonight, it finally occurred to me that these are all of the modules at the front of the pack which is a drum Howard has been beating for a week. The vent is at the front and since my pack had no liquid water in it, condensation from humidity in the air must be the cause.

I made a couple of small modifications that will prevent the plastic shield from coming in contact with any components on the BMB. Most of the corrosion was on 26/27 caps that appeared to be making contact with the flap of the lower shield that goes inside the flap from the upper shield. Because BMB #9 had corrosion I didn't notice on the first pass, I needed to order an additional BMB out of an abundance of caution. Otherwise, everything is clean and assembled and ready to go back into the pack.

Out of an abundance of caution, I wanted to ask anyone with more experience with lithium cells about the photo here. This is one of the stronger examples but I have many instances throughout the pack on most modules where the plates are stained with something. It won't wipe off with alcohol swabs and doesn't seem to be corrosion - more of an etch or stain on the metal plate. Any concerns?

2779ACB4-EE72-4BE7-B6DF-FE0F82592EBA_1_105_c.jpeg
 
The plastic shields have round indents that make contact to the shield at six points top and bottom - three down each side. The rest of the contact is down rails that contact non-conductive raise bits around each cell (hundreds). I had a bit of corrosion under many (but not all) of these pads. This chemical burn is different. Good to see you have some instances. I suspect it happens to many battery cells but this is a unique application where a battery is welded to an adjacent piece of metal for life and leaves the evidence.
 
Okay - getting close! As mentioned, 15 of the 16 modules are ready. I checked the contactors and they are the black style which I think is the more current version. I wasn't having any issue with them and since they are somewhat serviceable without tearing the entire pack apart apart again and because new OEM parts from Tesla are unobtainium, I stick with these contactors. The next big riddle I have should be pretty simple but googling sends me down a bunch of unproductive bunny trails...

What sealant do I use to re-seal the lid? The coolant rapidmate and fuse cover is black but everything else is gray. EV Tuning says the black is Rightstuff which made me happy because I've used that for years in ICE applications and have literally never had a leak after a proper application. I'll gladly use that for those seals! What is the gray stuff? Bonus answer - about how many tubes will I need for everything? I'm estimating 2 so I'll order 3 unless someone says differently. I'm assuming/hoping whatever I need comes in a standard 10.5oz caulking tube
 
not quite like urs but i saw some spots on mine, don't think its an issue, still running strong here

View attachment 981851

View attachment 981852

These chemical corrosion marks might be from venting electrolytes from inside the battery cell. Electrolytes are corrosive hence can't clean off the etch marks. Don't really know why its venting post manufacturing or how common. Most 18650 usage in power tools and old laptops don't have a big shiny flat metal plate nearly to reveal the venting evidence. Posted a couple of videos on 18650 manufacturing showing electrolyte fill, vacuum process prior to sealing etc ( link ). BTW, I also read hydrogen out gassing is common during initial charge of newly manufactured lithium ion cells. So they are out gassed at the factory before sealing. But clearly some phones and laptops still have outgassing swelling of Lithium Ion battery cells.

Probably good to collect some statistics from those that have handled a lot of modules to understand the prevalence and possible cause. Common post manufacturing issue might be okay but if caused by moisture presence, then probably more worrisome.
 
What sealant do I use to re-seal the lid? The coolant rapidmate and fuse cover is black but everything else is gray.
i thought i posted it but can't find it now...

Tesla service manual calls for Threebond 1216e (Rapid mate Low Voltage replacement section)
1697218421893.png

Seems hard to find and expensive (its a great Japanese brand that we use at my high tech job)
I just used Sikaflex 221 since we stock it at our family shop.
I used about 1.5 tube..

1697218578527.png
 
Thanks. I'm sure there are dozens of products that would do a good job but I wanted to check. It also has to be gray so the battery looks less 'modified' at a glance if the SC gets it at some point. They wouldn't understand that it has been improved...
 
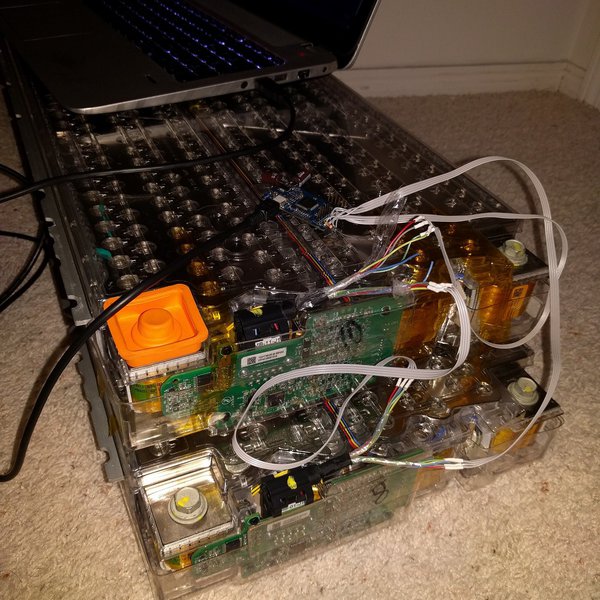
The modules are back in and now I'm stuck again. I have the HV Battery Logic Harness 1014593-00-B mentioned in CD-21-16-003. I have a laptop with an actual 9 pin serial port so I was hoping to use the cable to ping the BMS and check that all of the BMBs are reporting good values before I glue everything together.

What are people using to test the batteries on the ground before they install? I know brainhouston just put the battery back in the car with the cover off. I could do that but there should be a way to read the CANbus with the battery out. Any help would be appreciated!
 
I think u just need any canbus reader n pc software like cangaroo
As long as BMS gets 12v it should send can messages

PS. I did put covers back on for testing, just without sealing n only few screws. U need at least hump cover to hold coolant quick connects n back cover for plugs.
 
Last edited:
  • Informative
  • Like
Reactions: Krash and mr_hyde
Had a Discord chat with ScanMyTesla (SMT) developer who works for an EU EV repair shop. He said they use SMT to check the standalone battery pack after repair. The connection is roughly

- connector to BMS plug

https://www.mouser.com/ProductDetail/Molex/33472-1201?qs=3DzawVMofg8h3EvImCC56Q==
https://tools.molex.com/pdm_docs/as/AS-33472-100-001.pdf
wired to male OBD2 connector
I presume supply 12V power to BMS plug and OBD2 connector

- Connect BT OBD2 reader to male OBD2 connector

- Use SMT to pull pack info

SMT dev also mentioned about the need to keeping BMS awake which is noted in the Tesla guide ( CD-21-16-003 ) Didn't say how they did that.

Anyway, just noting SMT seems can be used to replicate the functionality of the Tesla Battery Shipping Tool mentioned in their guide. Require making a simple jig. Unfortunately I don't have the detailed recipe but wanted to note its possible.

Directly connecting to BMB(s) are possible too as outlined by Colin's open source project. My understanding is SavvyCan came from this starting point.

 
Last edited:
Progress today! I bolted the lid on the pack with a few screws and no glue so I could install the pack temporarily and make sure everything is good.

The good news is SMT showed valid voltages for all 96 bricks. The bad news is I still have BMS_f107_SW_Cell_Voltage_Sensor which seems to be keeping the contactors from closing. The car will power up but there doesn't seem to be any HV and it won't unlock the charge port. My main question is if f107 is latching and if so, how do I clear it so I can move forward?

IMG_2952.jpeg

AD2FE965-A0F1-4C4E-935E-C92DBDB39324.png


B2B801A6-5090-49AB-8036-4D7CD7ED82AF.png