I'm gonna give it a try this weekend. I already have the rest of the wiring done for both cameras. This is the final piece!I hoped this helped other do an install. I know it always helps me to see a detailed instruction on someone elses install so I figured I'd contirbute as well
Tifa did you get that part figured out? They are pretty snug in there and do take a bit of force.


Welcome to Tesla Motors Club
Discuss Tesla's Model S, Model 3, Model X, Model Y, Cybertruck, Roadster and More.
Register
Install the app
How to install the app on iOS
You can install our site as a web app on your iOS device by utilizing the Add to Home Screen feature in Safari. Please see this thread for more details on this.
Note: This feature may not be available in some browsers.
-
Want to remove ads? Register an account and login to see fewer ads, and become a Supporting Member to remove almost all ads.
-
On today's TMC Podcast, we ask the question "What is the Tesla Cybercab?". Join us on YouTube live at 1PM and participate in the chat.
You are using an out of date browser. It may not display this or other websites correctly.
You should upgrade or use an alternative browser.
You should upgrade or use an alternative browser.
I hoped this helped other do an install. I know it always helps me to see a detailed instruction on someone elses install so I figured I'd contirbute as well
Tifa did you get that part figured out? They are pretty snug in there and do take a bit of force.
Thanks for the detailed post! I have a question maybe you can help with. I'm At the tail end of my Blackvue install, I pulled the video cable through the rubber boot and that's where it is now. Where do you route cable after the rubber boot on the hatch? I didn't see any openings where I can route the video through after the boot. I thought there was a spot in the middle of the hatch, but I wasn't able to get it through there.
Thank you
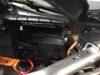
@Fezzik Yes! I got it out (and without breaking anything, lol). The metal clips didn't come down with the plastic piece and some of the mini prongs were bent in different directions, so I could see where the resistance was coming from. I pulled them out and bent them back to where they could slide back onto the plastic cover. Attaching some pics in case others have an ultra stubborn one like mine.


? for the OP and the crowd. Any thoughts on best routing of cords to rear hatch camera, for those of us WITHOUT a sunroof?
I don't have a sunroof. I just tucked it under the weather stripping and used trim tools to pry open the lining enough to push the cables in near the headliner. I "jumped the gap" near the hatch and tucked the rest of the cable length under the plastic panel as others have done.
Here are some pics:


CSFTN
Active Member
I can't figure out how to PM with this new software. Where's it hidden?
Tifa, only the last 2 of your pictures comes thru for me. Can you either post again or PM to me? Also, you did yourself or had it done?
Is it routed from windshield next to autopilot under headliner, or around the headliner then around the tops of the doors? Down the A pilar and along the floors of the doors?
HankLloydRight
No Roads
Also where can I get the switched power from, I am installing the Escort 9500ci
Behind the plastic panel, under the carpet, of the left side of the passenger footwell there is a +12v switched harness running to the USB ports. I tapped into those. Newer cars have an additional accessory harness at this location specifically for third-party accessories.
Finally completed my install over the weekend, but dear lord this car is not build to work on. Those poor service center workers that have to pull out the whole frunk every time they have to change a Battery or reach anything. I have noticed a few broken clips etc and clamps that were broken off by the service center too. Does anyone know where I can get a few of those blue clips that are used to hold the trims in place ?
whitex
Well-Known Member
Finally completed my install over the weekend, but dear lord this car is not build to work on. Those poor service center workers that have to pull out the whole frunk every time they have to change a Battery or reach anything. I have noticed a few broken clips etc and clamps that were broken off by the service center too. Does anyone know where I can get a few of those blue clips that are used to hold the trims in place ?
You can get them from the service center. They just gave me them. But I heard some will charge you.
I can't figure out how to PM with this new software. Where's it hidden?
Tifa, only the last 2 of your pictures comes thru for me. Can you either post again or PM to me? Also, you did yourself or had it done?
Is it routed from windshield next to autopilot under headliner, or around the headliner then around the tops of the doors? Down the A pilar and along the floors of the doors?
Sorry guys, I've been on work travel the past couple of weeks. I'm not sure what's going on with the pics. I'll try to add them all in an album. Will post back with link when it's done.
I did the install myself - very slowly, because I'm a newbie and didn't want to ruin anything. I started at the OBDII connector. I made a custom OBDII-to-female 12V connector (before I got my car to help with the waiting!). Teslarati has great instructions. I didn't know there would be a vacant connector in the mic grill. Oh well. At least you all will know ahead of time
")
Hopefully you'll be able to see in the pics. I took the driver side rocker panel off so I could connect and tuck the dashcam cables to the OBDII connector and route them up the A pillar, under the weather stripping. I used a snake to pull the cables (just the ends that will connect to the front dashcam through the headliner into the mic grill, then out through the autopilot housing. The rear dashcam cable, I ran it along the top of the door, tucking it under the weather stripping, then used trim tools to tuck inside of the interior paneling (B and C pillars). I "jumped the gap" near the hatch as others have done, removed the back panel, wire tied the excess cabling and left just enough out to plug into the cam.
Looks like it's too late to edit my previous post (Anyone know the timing for that?). Here's the link to my album in dropbox: Dropbox - ModelS - Blackvue Install
Let me know if anyone has trouble viewing it or questions. Again my apologies for the late response!
Let me know if anyone has trouble viewing it or questions. Again my apologies for the late response!
whitex
Well-Known Member
Thanks Fezzik. Very useful step by step tutorial. I just finished my BV install and going to be doing radar/laser install possibly next weekend. Your post definitely saved me some time. I do have one question:
Your suggested yellow line for wiring runs basically along the side curtain airbag, no? Are there any concerns with the wires interfering with airbag deployment, and/or potentially damage the airbag while fishing the wires through? I don't have a pano, and I found a nice "channel" as shown by red dotted line below..
One more piece of useful info, the unswitched 12V under the microphone grill uses Fuse 50 (5A used for car siren).

I ran the rear cam wire on the inside of the headliner and taped it down. It fits in the space between the headliner and the glass. See the line in red. I ran it to this spot and left it hanging for the time I run the two rear laser wires.
View attachment 153055
Your suggested yellow line for wiring runs basically along the side curtain airbag, no? Are there any concerns with the wires interfering with airbag deployment, and/or potentially damage the airbag while fishing the wires through? I don't have a pano, and I found a nice "channel" as shown by red dotted line below.
.One more piece of useful info, the unswitched 12V under the microphone grill uses Fuse 50 (5A used for car siren).
Thanks Fezzik. Very useful step by step tutorial. I just finished my BV install and going to be doing radar/laser install possibly next weekend. Your post definitely saved me some time. I do have one question:
Your suggested yellow line for wiring runs basically along the side curtain airbag, no? Are there any concerns with the wires interfering with airbag deployment, and/or potentially damage the airbag while fishing the wires through? I don't have a pano, and I found a nice "channel" as shown by red dotted line below.
One more piece of useful info, the unswitched 12V under the microphone grill uses Fuse 50 (5A used for car siren).
View attachment 182778
I ran the wire above where the airbags would be. They are in there but there is a spot to run the wire. The airbags are pushed against the trim so the trim gives when they blow..
Jeff65
Member
Fezzik,
Very helpful, thanks! I have already used this guide to install a dash cam. I am getting ready to pull the trigger on installing an Escort 8500.
1) Did your Beltronics unit have separate receivers for Radar and Laser? The Escort seems to have one combined receiver and I wonder if it will receive laser from behind the nosecone?
2) Do you need to apply anything to the trunk grommet/rubber boot before you reinstall it to keep it watertight?
Jeff
HankLloydRight
No Roads
1) Did your Beltronics unit have separate receivers for Radar and Laser? The Escort seems to have one combined receiver and I wonder if it will receive laser from behind the nosecone?
The radar sensor goes behind the nosecone. The two laser shifters are separate, and need to be installed in the lower grill -- they need clear line of sight.
Similar threads
- Replies
- 4
- Views
- 968
- Replies
- 5
- Views
- 2K
- Replies
- 19
- Views
- 1K