Welcome to Tesla Motors Club
Discuss Tesla's Model S, Model 3, Model X, Model Y, Cybertruck, Roadster and More.
Register

Car died. BMS errors f123, w123, w073, w035, w142, w158

This site may earn commission on affiliate links.
This is a very interesting thread!

I recall from our house flood that the crew ran dehumidifiers until the rooms reached a target humidity.

What if, when you believe the pack to be dry, you temporarily seal the pack but place a humidity probe in there (safety first!) for some period of time.

I'm wondering whether a dry pack would maintain ambient humidity, but a still-wet pack would climb above that. Two humidity sensors would let you monitor that.

 
i was going to stash a wireless humidity sensor in the pack before closing it to monitor humidity..
ideally would be nice to put it behind pyro cover to be able to remove/reset/change battery but not sure if enough space there yet...
also, if pack acts like faradays cage, only option would be behind orange cover...
 
  • Like
Reactions: alstoralset
That's an good idea.
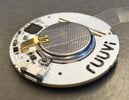
These are really small, and you can remove the casing.
Maybe glue it on top of the pyro fuse? Or simply to the inside of the fuse lud.

Not sure if BT signal will go thru the lid but I think it will, if your phone is close.


Battery lasts 2 years.
 

Attachments

  • Ruuvitag_board.png
    Ruuvitag_board.png
    304.1 KB · Views: 568
Last edited:
  • Helpful
Reactions: brainhouston
I have one of the Ruuvitags on my desk now.
My company actually sell these.

It will not fit thru the vent holes for the umbrella valves, but should fit between the HV fuse and the lid.
And obviously have to be glued on to the lid (preferably) or the fuse, so it does not move around.

Actually I will check if I can add one extra 2477 cell in parallel for double capacity.
(one cell is 1000 mAh).

If it can last 4 years that's much better than 2 years.
 

Attachments

  • Ruuvitag.jpg
    Ruuvitag.jpg
    485.1 KB · Views: 45
Last edited:
BTW, I'm thinking the umbrella valves are there not for getting rid of any kind of water. Rather, they are to releasing outgassing of a thermal runaway cell rather than pressurized explosion.

It seems the battery pack really wants to be hermetically sealed. If air channel is opened up and outside moist air is able to come in. Accumulation of water condensation inside the pack is unavoidable.

Thoughts?
Yeah its been said before, umbrella valves are for emergency release of pressure.
Heat/pressure has to escape during supercharging.
There's 2 breathers for that, one on top of penthouse n one behind orange cover.
1682010668041.png
1682010685095.png

^ this one i think is dual purpose, cause its spring loaded, so maybe also functions as fast pressure relief..

1682010798126.png
1682010815994.png

^snap in type
something like this maybe?..
 
Tomorrow I am putting my battery back together, and up in to the car.

And will attempt to glue the humidity sensor to the inside of the fuse lid.

Basically new fuse, new lid, new umbrella valves and two weeks of drying the battery by blowing hot air 24/7 thru the battery.
 
  • Like
Reactions: brainhouston
Tomorrow I am putting my battery back together, and up in to the car.

And will attempt to glue the humidity sensor to the inside of the fuse lid.

Basically new fuse, new lid, new umbrella valves and two weeks of drying the battery by blowing hot air 24/7 thru the battery.
I was only able to fit humidity sensor behind the pyro fuse to the side of the white case, won't fit anywhere else in my case
1682012995612.png

Will have to remove pyro if i ever want to take it out or change battery...
 
So back on topic...
I finally dried all sections n put the battery back together (without sealing yet, for testing).
Put it back in the car n to my surprise it started with no errors :)
Drove it around the block n all is good.
Took the battery back out again to seal it.

I guess your short must be between the module bottom electrode plates?

Think any water got to any boards? And do the boards have moisture seal coasting on them?
 
I guess your short must be between the module bottom electrode plates?

Think any water got to any boards? And do the boards have moisture seal coasting on them?
Yeah, it was shorting HV to ground from bottom of front left module like i posted earlier (not sure how the module count goes)
Don't think water got high enough to BMBs n not to BMS or that rear electronics section, that one was dry.
Yes, BMBs n BMS have coating on them.
 
Yeah, it was shorting HV to ground from bottom of front left module like i posted earlier (not sure how the module count goes)
Don't think water got high enough to BMBs n not to BMS or that rear electronics section, that one was dry.
Yes, BMBs n BMS have coating on them.

Cool, then perhaps the only risk is the ultrasonic welds on the cell electrodes and the plate. Wonder how they will hold up. But your case wasn't constant submerged. It was mostly not touching the water until car was on slopes. So perhaps there is not much chance of corrosion issue..

Don't know if water can make it inside of the cell. Probably not, if it did, you'd have a lot more problems haha.

 
I am happy to report my car also came back to life with no error messages after putting back the battery yesterday.

There was no room to fit the humidity sensor behind the fuse lid.
I will leave that for next time, if I ever have to drop the battery again.
I guess opening the "penthouse" and gluing it inside there is the only choice.
Awesome n thanks for confirming.
Like i mentioned earlier, u can fit the humidity sensor behind the pyro fuse (remove the pyro n tuck it on the side behind it)
No need to re-open penthouse.
 
Short and sweet:
Battery is re-sealed, installed and car is back on the road.
150mi and one car wash later still running strong.
True test will be in the rain but currently pdx got a hot sunny week so will update after some driving in the rain.

Its a labor intensive repair so i don't recommend it and would definitely NOT do this as my daily job but it was fun and great learning experience!
One more HV pack saved (+ money) and i'm happy i didn't listen to suggestions to just throw it away.

Will post some details and things i've learned in following posts.
 
Some details i've noticed/learned that i couldn't find anywhere else. Will probably make few posts...

Like i mentioned earlier, at least on MX, you can remove the metal covers that protect umbrella valves/plugs with battery installed. Just have to remove rocker moldings. This way you can check for water or remove valves/plugs and use the holes for drying the battery without removing it (like another member reported here).
New umbrella valves/plugs can be ordered from Tesla (#1026758-*)


1682549785755.png

^ notice the foam on the edges, i guess to prevent debris/water from directly entering behind this cover.
Not shown: there's also plastic trim pieces that cover those oval holes, so only side slits remain open when fully assembled (just to drain any residual water).
I scraped all the dirt from inside these metal covers to prevent water pooling up there.

Back cover is attached with E8 torx Plus, took me a minute to figure out haha, available from your local auto parts store.
1682549742102.png


Top plastic barrier is attached with butyl like glue. I carefully cut it with a blade in between while pulling the sheet away. This way both surfaces still had butyl on it and i just pressed it in after to re-attach. I wanted to reheat it but after testing, it was sticky enough to just go on cold. I did put a strip of packing tape on the metal battery cover to prevent dust and dirt making it less sticky. You can always buy a roll of butyl tape and just reseal with new.
1682548140558.png

it was kind of hard to take the tape off, so maybe better to use non-sticky side or something like wax paper if you go this route.
1682549713527.png

Center guide bolts have double sided tape around to hold/seal the barrier when installed in the car.
Overall the battery was clean/dry on top, thanks to the strip of rubber seal at the front
1682548866061.png


Now front/rear guide bolts are just mated directly to body.
Front ones have a butyl piece of tape just stuck over the nut, mine were fine but i've seen on some youtube videos where this came off n water got inside the bolt and then into battery cause either threads or the top o-ring weren't sealed.
1682549609225.png
1682549872314.png

I did some testing and only about half the threads engage when assembled so make sure to put some sealant or Teflon tape to seal it.
O-rings were covered in red grease. These could be re-used and hold well if the surface is flat. Since the top cover was a bit warped, i added some grey silicone in the questionable flatness areas.
All top bolts except rear two screw in to these ones on the bottom side of the case:
1682550602984.png

I originally thought it needs special tool but then realized its just indented with 6 notches to fit 17mm Allen.
In my case one of these was about 2mm undone, however i don't think it let the water through cause the rubber seal is about 3-4mm thick.
FYI, top silver bolts are left hand threaded, to prevent them from undoing the bottom half when assembling.
 
Since i knew i had to remove modules and disconnect coolant hoses, i had to drain it, instead of making a mess later in the case.
I followed wk057's suggestion to just insert hoses on the inside to open the valves.
One hose pushing the air in, out the other coolant comes out to a bucket. I was careful but better to use regulated air, coolant system is not designed to be more than 5psi i think.
1682638876906.png

1682638726956.png
1682638819927.png

Silicon hoses were just the right diameter and needed to be slightly expanded to seal good.
For air side i just inserted the fitting and cut out the sides for air.
For coolant one, i put one of those nipples from compression fitting and bent the sides to let the coolant through.
About 1gal came out.

For refilling, i had to push air into the jug and have another hose going into empty one, cause some coolant would go through. Had to do this twice to get most of coolant in. For this reason, vacuum fill didn't work.
I wanted to check for leaks after so i left the pack open and had to cover work area with plastic. I also pressurized the system to 5psi to be sure and nothing leaked.
1682639329789.png


Coolant valves are sealed with black silicone to the penthouse cover, i'm guessing since its more oil resistant.
This was much harder to separate, u have to be careful not to break anything
1682639737672.png

When i installed unsealed battery for testing, i cut out a gasket for this from cork material and taped all nearby screw holes in case coolant leaks.
I'm glad i did, cause depending on how fast you raise/lower the battery, some coolant spills, i had a small puddle but nothing went into the battery.

Removing coolant lines from modules was straight forward but challenging due to lack of space.
Plastic tubes are really hard and don't bend well.
Right side is easy since its on top but left side didn't have enough slack and i didn't want to bend too much so i found it was easier to lift the module a bit (~1/2in). I used roll of electrical tape stuck between frame and yellow casing to hold the module raised. I disconnected right side, unlatch the left side, raise the module then pull off left side.
Don't have exact pic but you get the idea. Left side circled.
1682640558435.png


Some coolant would still spill when disconnecting, so i put a paper towel underneath to catch it.
Not super critical when removing modules but when installing you wanna keep the pack dry and clean.
Once modules were removed some coolant would still drip and also to protect the surface, i used rubber end caps to cover it up.
1682641930160.png

These are great to have in your toolbox or junk drawer anyways.