


Welcome to Tesla Motors Club
Discuss Tesla's Model S, Model 3, Model X, Model Y, Cybertruck, Roadster and More.
Register
Install the app
How to install the app on iOS
You can install our site as a web app on your iOS device by utilizing the Add to Home Screen feature in Safari. Please see this thread for more details on this.
Note: This feature may not be available in some browsers.
-
Want to remove ads? Register an account and login to see fewer ads, and become a Supporting Member to remove almost all ads.
You are using an out of date browser. It may not display this or other websites correctly.
You should upgrade or use an alternative browser.
You should upgrade or use an alternative browser.
Car died. BMS errors f123, w123, w073, w035, w142, w158
- Thread starter brainhouston
- Start date
Found where it was shorting. It was the same module where the broken plug was, same corner too.
Not completely sure if i broke the corner of the tray or it was like that but doesn't really matter, just means water got in there sooner than later...


FYI, these plastic bottom trays are shorter on the outside vs inside edge


This all makes sense now...
When isolation error 1st popped up, my car was backed in the slanted driveway (i live on a hill), so drivers corner of the car was the lowest point.
Then when i pushed the car into garage, isolation went away, since battery was leveled now n water just spread out over left side of the battery.
Then as soon as i left my garage, car tilted forward again n caused isolation again...
Its always nice to get to the bottom of the issue")
FYI, to get either left/right front modules u have to remove the top hump module first, due to black support bar..

Not completely sure if i broke the corner of the tray or it was like that but doesn't really matter, just means water got in there sooner than later...
FYI, these plastic bottom trays are shorter on the outside vs inside edge
This all makes sense now...
When isolation error 1st popped up, my car was backed in the slanted driveway (i live on a hill), so drivers corner of the car was the lowest point.
Then when i pushed the car into garage, isolation went away, since battery was leveled now n water just spread out over left side of the battery.
Then as soon as i left my garage, car tilted forward again n caused isolation again...
Its always nice to get to the bottom of the issue
FYI, to get either left/right front modules u have to remove the top hump module first, due to black support bar..
Not completely sure if i broke the corner of the tray or it was like that but doesn't really matter, just means water got in there sooner than later..
View attachment 922363
Given how tiny your broken vent plug was and assuming never in standing water for it to come through. Then the accumulated water is just condensation? Which could have accumulated in the chassis tub and/or plastic tray tub. Saw a youtube video (can't find it now, I think by the Ukraine EV repair guys CarRepairVideos) testing with compressed air on the Tesla battery pack to check for failed air seal. Not sure where and how one might do that... Just saw it in a video before.
p7 of this document shows 3 brick's + - bus is flipped from the other 3 within the module.
IEEE Xplore Full-Text PDF:
Just a theory below, perhaps those with more experience can chime in
- If you had a cracked plastic tub, then it would be low iso btw one of brick's + or - against the battery chassis. I'm assuming Tesla battery pack has low iso check for this.
- If no cracked plastic tub, then low iso between 2 adjacent bricks may not trigger anything? since they are likely wired in series? Just guessing, have not inspected battery module up close.
NewbyMaybe
Newby1Kenowby
A crack near a wheel will get sprayed every time a puddle or rainy day is encountered. Some water may have drained out afterwards.
Not necessarily. I think water could have been pooling in the umbrella valves metal covers n then slowly getting sucked in by heat/cold effect of pack..Given how tiny your broken vent plug was and assuming never in standing water for it to come through. Then the accumulated water is just condensation?
That would be my guess.
Yeap, i saw that video. There's a fitting in the back left of pack, i think its accessible with pack installed.Saw a youtube video (can't find it now, I think by the Ukraine EV repair guys CarRepairVideos) testing with compressed air on the Tesla battery pack to check for failed air seal. Not sure where and how one might do that... Just saw it in a video before.
i'm planning on doing that test after re-assembling the pack, along with vacuum test. Not sure how much pressure umbrella valve can hold but vacuum should be a good test too
Nice doc. Although, either they got Top/Bottom view confused or they calling shell of the cell as plus.. I think triangular tip of the cell is considered plus..p7 of this document shows 3 brick's + - bus is flipped from the other 3 within the module.
IEEE Xplore Full-Text PDF:
Pretty sure BMS can only detect iso to ground. In my case i think it was definitely pooling up in battery case n touching bottom of module.Just a theory below, perhaps those with more experience can chime in
But of course road grade and momentum will cause water to pool deeper in various locations resulting in more low iso opportunities.
- If you had a cracked plastic tub, then it would be low iso btw one of brick's + or - against the battery chassis. I'm assuming Tesla battery pack has low iso check for this.
- If no cracked plastic tub, then low iso between 2 adjacent bricks may not trigger anything? since they are likely wired in series? Just guessing, have not inspected battery module up close.
If 2 adjacent bricks would get water, i think it would cause short for just those 2 bricks n discharge/drop voltage there, maybe other errors in that case
Also, i saw somewhere the error "sum of bricks v not matching total"... that could be what happens when just 2 bricks short
My quick scratch
Yeap, i saw that video. There's a fitting in the back left of pack, i think its accessible with pack installed.
View attachment 922697
i'm planning on doing that test after re-assembling the pack, along with vacuum test. Not sure how much pressure umbrella valve can hold but vacuum should be a good test too
That would be cool if can do a seal test without dropping the pack to provide an easy check for moisture intrusion potential.
Tesla service manual for Model X section Rapid Mate - Low Voltage - HV Battery 2.0 (Remove and Replace) describes the following steps after reassembly
- Perform a HV battery enclosure leak test. See SI-20-16-004, “High Voltage Battery Enclosure Leak Testing and Repair, Model S and Model X”.
NewbyMaybe
Newby1Kenowby
With the front end elevated and the battery opened at the junction box or any other spot, could you vacuum out any moisture through the rear hole? For testing purposes?
i thought about that, technically possible (this is whats done before AC system charge), but will plugs/umbrellas handle the vacuum?..With the front end elevated and the battery opened at the junction box or any other spot, could you vacuum out any moisture through the rear hole? For testing purposes?
another point is can cells handle vacuum??..
HV case has 2 pressure relief/check valves (haven't verified what they are yet..), one on top of hump n one under orange cover... maybe they are there to prevent vacuum in the pack...
looking at the graph, u have to get close to 29inHg to start boiling water at room temp...
then, how to verify the battery is dry without opening it...
if any spot is open, it wouldn't be vacuum, just sort of running air thru, guess it might dry but probably takes long n not efficient...
NewbyMaybe
Newby1Kenowby
If something can be opened to vent the pack then the umbrellas wouldn't be stressed, in theory.
For testing purposes, assuming the moisture would be unobstructed from settling near the lower hole, some would show in the bottom of a clean shop vac.
For testing purposes, assuming the moisture would be unobstructed from settling near the lower hole, some would show in the bottom of a clean shop vac.
NewbyMaybe
Newby1Kenowby
Also it would seem safer to have the vacuum running while elevating the front to lessen the chance of water arcing voltage or ?
u could tilt the battery/car left/right first n drain excess water thru umbrellas then do the rest with vacuum but in my case water was staying under emf bottom shields due to surface tension... not sure if it would even dry under there by just running air thru
my battery sat open for few days n it looked dry but after removing module/emf there was still a lot under there..
for vacuum boiling to work u have to keep it at ~29inHg so opening anything would negate that...
i'll do some experimenting after i re-assemble it but won't be pushing it too far since its still a good pack (i hope)
Went by @brainhouston location (not far from me) and got a good look at the disassembled pack. Here are some thoughts on drying without opening the pack.
Been devising a similar LDU coolant leak mitigation concept without dropping and disassembling the LDU so am familiar with the simplification motivation. Tesla LDU - Preventive Mods
Anyway, on the battery pack.
Moisture is trapped below battery module
Any scheme to dry and seal off battery pack without opening will be challenging. The umbrella valves on the side of each module bay isn't the lowest spot as @brainhouston mentioned in post #40. Each module bay has few mm rectangular depression at the bottom. Presumably to accommodate the thin liner/shield below each module and/or for the module in their plastic tub to sit and aligned properly. (all the pictures and videos shows these shield on top of module, but they are on bottom too). The gap between this shield and inner bottom pack surface is where moisture will be trapped by surface tension to keep it there. Here is a spot in the pack disassembly video that shows where this liner in every module bay. Unfortunately, can't find any pic/video of people actually pulling these up but @brainhouston showed me on this pack.
I suppose one possibility is to create air flow through the pack to hopefully dry it out over days+weeks. Another would be to drill 2 holes on pack bottom at each module bay and pump air flow between this gap to dry it out. Of course then have to deal with sealing the drilled holes and the additional source of moisture entry.
Most of the bottom holes along the side don't have umbrella valves
@brainhouston pack has ~6 ~>= quarter sized holes on the outside of each module bay. In most bays, only 2 of these had umbrella valves. Rest of the holes were just closed by plastic cap + o-ring to seal the hole. It is one of these plastic caps toward front of the car that cracked for @brainhouston due to accident. It probably would have been better to just 1) not drill these unnecessary holes 2) maybe seal them with something better than the plastic cap+o-rings.
Protection over plastic caps and umbrella valves further traps moisture and dirt
@brainhouston pack is model X and seems to have different protective coverings over these caps+valves than my 2013 Model S. His also shows a metal protective shield followed by vented plastic shield. The thin gaps between these coverings are prime for trapping moisture and dirt. Seems highly desirable to remove these periodically for cleaning if possible without removing the pack (@brainhouston said X was possible, I still need to study my S more) Here is where I picked out some clogged vents on the outer most plastic cover
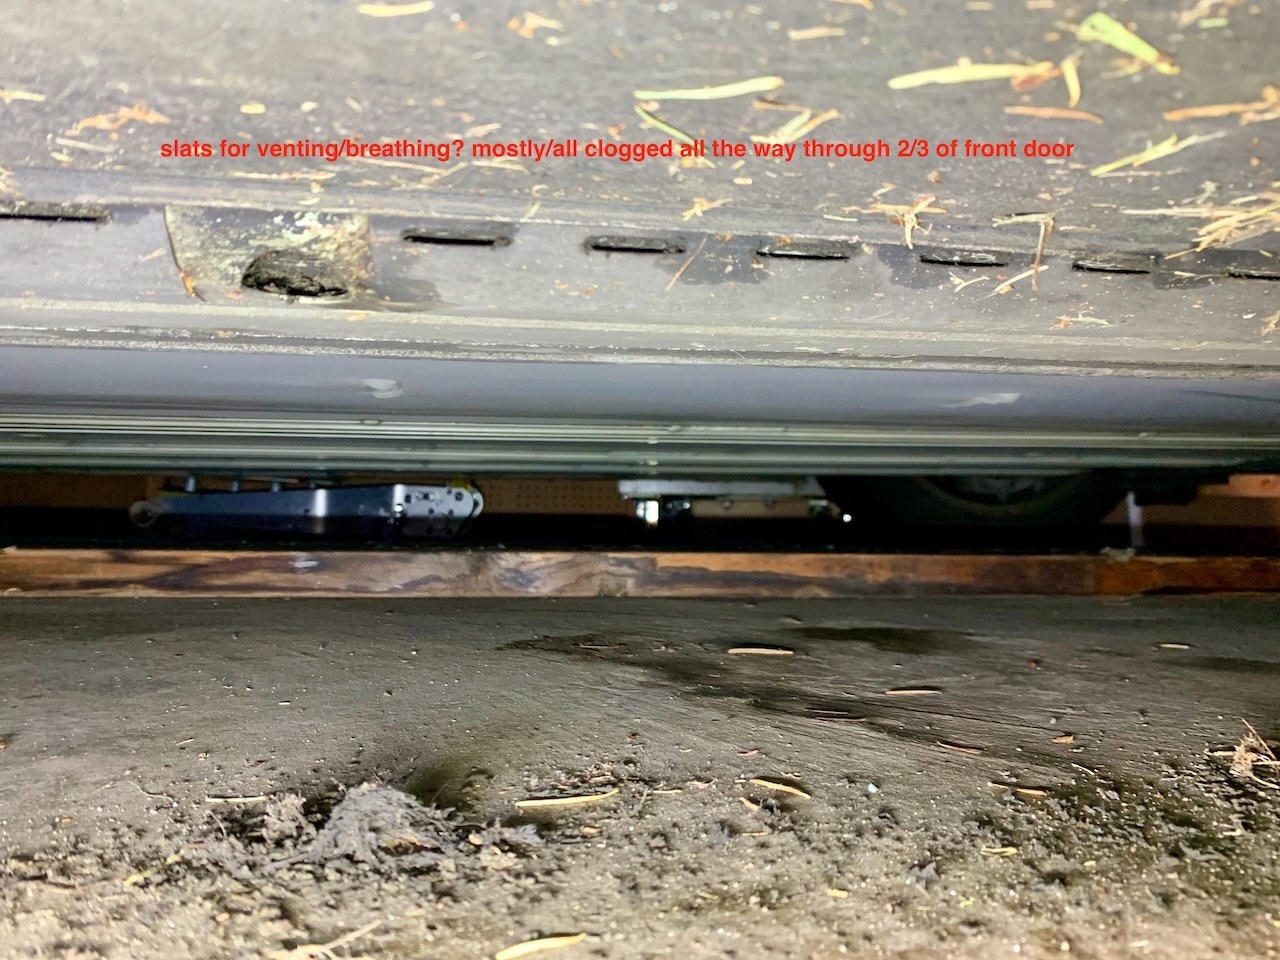
 teslamotorsclub.com
Moisture and dirt are trapped inner side (closer to the caps+valves) of both metal and plastic vent shield.
Been devising a similar LDU coolant leak mitigation concept without dropping and disassembling the LDU so am familiar with the simplification motivation. Tesla LDU - Preventive Mods
Anyway, on the battery pack.
Moisture is trapped below battery module
Any scheme to dry and seal off battery pack without opening will be challenging. The umbrella valves on the side of each module bay isn't the lowest spot as @brainhouston mentioned in post #40. Each module bay has few mm rectangular depression at the bottom. Presumably to accommodate the thin liner/shield below each module and/or for the module in their plastic tub to sit and aligned properly. (all the pictures and videos shows these shield on top of module, but they are on bottom too). The gap between this shield and inner bottom pack surface is where moisture will be trapped by surface tension to keep it there. Here is a spot in the pack disassembly video that shows where this liner in every module bay. Unfortunately, can't find any pic/video of people actually pulling these up but @brainhouston showed me on this pack.
I suppose one possibility is to create air flow through the pack to hopefully dry it out over days+weeks. Another would be to drill 2 holes on pack bottom at each module bay and pump air flow between this gap to dry it out. Of course then have to deal with sealing the drilled holes and the additional source of moisture entry.
Most of the bottom holes along the side don't have umbrella valves
@brainhouston pack has ~6 ~>= quarter sized holes on the outside of each module bay. In most bays, only 2 of these had umbrella valves. Rest of the holes were just closed by plastic cap + o-ring to seal the hole. It is one of these plastic caps toward front of the car that cracked for @brainhouston due to accident. It probably would have been better to just 1) not drill these unnecessary holes 2) maybe seal them with something better than the plastic cap+o-rings.
Protection over plastic caps and umbrella valves further traps moisture and dirt
@brainhouston pack is model X and seems to have different protective coverings over these caps+valves than my 2013 Model S. His also shows a metal protective shield followed by vented plastic shield. The thin gaps between these coverings are prime for trapping moisture and dirt. Seems highly desirable to remove these periodically for cleaning if possible without removing the pack (@brainhouston said X was possible, I still need to study my S more) Here is where I picked out some clogged vents on the outer most plastic cover
Battery Imbalance after 8 years
Seems I need to talk to my PR team... 😜 To many people think of gruber first and they mostly busy with roadsters Ya upload on YouTube of customer repairs to get exposure
teslamotorsclub.com
Moisture and dirt are trapped inner side (closer to the caps+valves) of both metal and plastic vent shield.
this is how it looks on X after removing the plastic running board@brainhouston pack is model X and seems to have different protective coverings over these caps+valves than my 2013 Model S. His also shows a metal protective shield followed by vented plastic shield. The thin gaps between these coverings are prime for trapping moisture and dirt. Seems highly desirable to remove these periodically for cleaning if possible without removing the pack (@brainhouston said X was possible, I still need to study my S more) Here is where I picked out some clogged vents on the outer most plastic cover
I looked at ebay pics of 85kWh pack n it seems to have same metal protective covers on battery, diff shape/color..
I've never seen S in person so it might have different body/running boards structure...
PS. Thanks for dropping by @howardc64
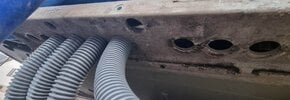
This is me trying to dry an Model S85 pack using two shoe dryers.
First step is remove HV-FUSE lid and all umbrella valves.
In an S85 pack there are 16 modules to dry, two modules in the "penthouse".
Each dryer has 4 hoses, and this model actually had hoses that fit to the holes perfect.
In the picture I have one dryer connected to one single module.
But I was kind of concerned that would be too much heat focused on one place so I have since moved on to connect only 1 hose to each module.
So basically 1 shoe dryer is drying out 4 modules.
With two shoe dryers I can connect 8 modules at the time, so half the battery.
The plan is to leave them constantly on, for 14 days. Once a day I move them..
Each dryer is 300W but probably 50W is for the fan, 250W for the heat.
The Penthouse is dried connecting one hose to the fuse lid.
If I had 4 dryers I could connect them to every single module. (they are like $40 each).
Already bought new HV-fuse (pyro), fuse-lid in stainless, and the new and improved umbrella valves.
But I want to make sure the battery is dry inside before sealing it up again.
For the first day or two I could smell the air coming out was damped, but now it feels and smells dry, and I will keep doing this another week.
Any thoughts? It seems to work really well.
Attachments
Nice idea. Keep us posted how it works out.
I chose to open the pack cause i wanted to study it n find the source of isolation.
In my case most of water was staying under bottom emf shields n all 15 sections of battery had water under it.
Not sure if water will dry out from under there ur way or how long will it take, no way to verify w/o opening the pack.
I did notice white water spots on the very back right section, so it was drying slowly i guess. By this point pack was open for about 2 weeks...

Maybe u can add silica packets inside each section before putting umbrella valves back, to soak up residual moisture if any..
Where did u get new umbrella valves? can u share part number?
Also, did u find where water ingress was? its pointless to dry n re-use the pack if u can't solve that.. it will just happen again.
I chose to open the pack cause i wanted to study it n find the source of isolation.
In my case most of water was staying under bottom emf shields n all 15 sections of battery had water under it.
Not sure if water will dry out from under there ur way or how long will it take, no way to verify w/o opening the pack.
I did notice white water spots on the very back right section, so it was drying slowly i guess. By this point pack was open for about 2 weeks...
Maybe u can add silica packets inside each section before putting umbrella valves back, to soak up residual moisture if any..
Where did u get new umbrella valves? can u share part number?
Also, did u find where water ingress was? its pointless to dry n re-use the pack if u can't solve that.. it will just happen again.
Last edited:
In my case the HV fuse blew, while driving.
On the S85 the fuse lid is on top of the battery and was rusted to the point where it tore apart when opening.
So that's when I discovered I also had moisture inside, and honestly probably more than you had.
I still have not had any error messages about internal resistance.
So the source of the leak is located.
With an new fuse, new lid and dry battery it should be ok for a few more years, I hope.
I am quite confident about circulating hot air in the casing will dry it out, its just a matter of time.
But I see what you mean about water under the emf shields will be hard to dry out.
Maybe I should add an extra week to the process, just to be sure.
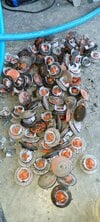
The Umbrella valves has part nr 1026758-00-D (fits 2015-2021 Model X as well).
An replacing ALL 14 of them was like $75 in total.
You can buy them over the counter at Tesla, its not restricted. At least not in Europe, where I live.
Originally my S85 had ALL (14X6) 84 valves as in picture below.. but with this newer version it will be (14X2) 28 valves in total.
Less chance of water ingress there I guess.
Did not mean to hijack your tread, just wanted to share my method to dry the battery.
Also, good to know that 170V at fuse terminal to ground is normal, found that in your tread.
On the S85 the fuse lid is on top of the battery and was rusted to the point where it tore apart when opening.
So that's when I discovered I also had moisture inside, and honestly probably more than you had.
I still have not had any error messages about internal resistance.
So the source of the leak is located.
With an new fuse, new lid and dry battery it should be ok for a few more years, I hope.
I am quite confident about circulating hot air in the casing will dry it out, its just a matter of time.
But I see what you mean about water under the emf shields will be hard to dry out.
Maybe I should add an extra week to the process, just to be sure.
The Umbrella valves has part nr 1026758-00-D (fits 2015-2021 Model X as well).
An replacing ALL 14 of them was like $75 in total.
You can buy them over the counter at Tesla, its not restricted. At least not in Europe, where I live.
Originally my S85 had ALL (14X6) 84 valves as in picture below.. but with this newer version it will be (14X2) 28 valves in total.
Less chance of water ingress there I guess.
Did not mean to hijack your tread, just wanted to share my method to dry the battery.
Also, good to know that 170V at fuse terminal to ground is normal, found that in your tread.
Attachments

Great work n info.
Glad to hear valves are available OTC. My pack already has new ones.
Don't worry about posting here, its nice to have similar issues in one place.
Glad to hear valves are available OTC. My pack already has new ones.
Don't worry about posting here, its nice to have similar issues in one place.
This is me trying to dry an Model S85 pack using two shoe dryers.
One idea is to run AC (but at room temp) through the pack to pull the moisture out. When running portable AC that requires removing water tray... a lot of water is removed from the air.
After seeing @brainhouston's pack. I realize any broken seal in the pack will allow humid air to come in which then will just condensate inside. 4'x8'x5" is about 30 gallons if empty. With battery in there, maybe still another 5-10 gallons of space exist for higher humidity air to occupy after broken seal.
Similar threads
- Replies
- 19
- Views
- 2K
- Replies
- 3
- Views
- 1K
- Replies
- 17
- Views
- 3K
- Replies
- 5
- Views
- 759