Welcome to Tesla Motors Club
Discuss Tesla's Model S, Model 3, Model X, Model Y, Cybertruck, Roadster and More.
Register

Anyone repair/repaint faded clearcoat on the carbon fiber rear spoiler?

This site may earn commission on affiliate links.
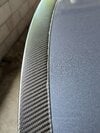
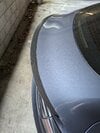
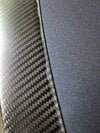
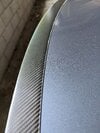
The clearcoat on my 2018 P3D's carbon fiber spoiler is failing and looks really bad. My first thought was to replace it with a new spoiler, but the original spoiler was placed on top of PPF. If I remove the spoiler, there is a chance I might pull up the PPF along with it. Below are a couple pics of my 5 year old spoiler.

My other option is to repair and repaint the spoiler. Has anyone else successfully done this? I am guessing after cleaning the spoiler thoroughly, I would then want to use sandpaper to remove the old clearcoat and then apply some new clearcoat paint to the repaired and clean surface.

Any suggestions on what sandpaper and which clearcoat paint I should use? I am guessing that a spray on paint might look better, but I am concerned about overspray getting on the rest of the car, even if I mask it up.

All info and suggestions are welcome.

IMG_6808.jpg
IMG_6807.jpg
 
Hey Joe. Merry Christmas!!

I definitely would not recommend the option of leaving the old spoiler on the vehicle and going through the process of sanding and clear-coating the accessible spoiler surfaces. Not worth the hassle IMO. You are obviously someone who cares about the look/finish of your vehicle (just like me). So, I just don’t think sanding/coating the existing spoiler will look good, especially if you do not remove the spoiler prior to sanding/coating.
Also, keep in mind that it will not be possible to sand/coat the edges of the spoiler if you simply leave it on the vehicle during the repair process. So, this means the new coat of clear that you apply will eventually crack/lift along the edges of the spoiler. It’s inevitable.

Too bad I do not live closer to you, so I could just drop by and show you just how easy (& stress free) it can be to remove your old spoiler (without damaging/peeling the PPF underneath). Lots of YouTube videos out here, but I think the best tips are:
1. Use 16 to 20 lb monofilament fishing line to cut through the existing tape/adhesive. 16 to 20 lb line will provide enough thickness/strength, so the line does not constantly break while you’re applying the back-n-forth “saw” cutting action.
2. Heating up the area with a blow dryer (to soften the adhesive/tape underneath the spoiler) may make it easier to cut through the tape. Heat one end of the spoiler first (where you will start the fishing line cutting technique) and continue to heat up the spoiler as you go along, switching between a little bit of cutting and then a little bit of blow drying.
Note, I did not find heating to be a necessary step, when I removed the spoilers on both my Model 3 and Y. But, the heat should make it easier to cut through the adhesive in most cases.
3. I think it is more important to constantly wet the fishing line with soapy water to provide some extra lubrication. Just spray the line and/or the entire area that you running/rubbing the fishing line, using a bottle of soapy water. Be liberal with the soapy water spray. This will greatly reduce the friction/heat created during the see-saw cutting action… which should also reduce the risk of causing any damage to the PPF underneath the spoiler.
4. Be patient and work slowly. Even with a lot of soapy water, the fishing line will likely break a few times during this removal process. This is probably a good thing, since the line breaking means less risk the line will rub too hard/much against the PPF or paint surface.
5. Once the spoiler is removed, use some type of adhesive remover (Goo Gone, WD-40, rubbing alcohol, etc…) to remove the leftover residue. This and/or simply rubbing the area with your fingers should be sufficient to remove the leftover tape/residue. Depending on how much tape/residue is leftover in your situation, this process may take the longest and require the most patience.

Good luck and feel free to send me a PM if you have any questions…

Thank you so much for the helpful post. I remember you posted about replacing the spoiler several months ago. You brought up some really good points about why replacement is better than repair. I’ll definitely pm you if I have any other questions.

Thanks again and happy new year!
Joe
 
You’re welcome, Joe. Of course, if you plan on selling your vehicle in the not too distant future, then perhaps just sanding & re-coating the existing spoiler (without removal) makes the most sense. It certainly won’t be perfect, but probably doesn’t need to be since anyone who buys your vehicle likely won’t care or notice…
 
  • Like
Reactions: joebruin77
it’s cheaper to replace with an aftermarket spoiler. Places like RPM Tesla have a ton to choose from that are affordable. They have a stock looking one but there are larger ones that could cover the area in question with PPF. I had a dent under my larger spoiler and forgot until I had to remove it due to the sun damage. You also may want to use ceramic coating on the new spoiler.
 
  • Like
Reactions: joebruin77
Quick update. I successfully removed my old, delaminated spoiler using GreenHokie's suggestion of 20 lbs fishing line, and installed a new replacement spoiler (see before and after pics below).

Removing the spoiler was relatively easy. The hardest part was removing the old adhesive (see first pic below). I used a hair dryer to heat up the adhesive and tried different chemicals to remove it (WD40, IPA wipe). At first, I couldn't remove all of the adhesive on the PPF. I emailed Xpel customer service and they recommended a product called Rapid Remover Adhesive Remover for Vinyl Wraps. I was about to order it when I remembered a professional detailer once told me that you can use alcohol-based hand sanitizer to remove tree sap. I figured it might work for adhesive. I applied the hand sanitizer to the adhesive, let it dwell for about 5 minutes, and then rubbed it off with a clean microfiber. I had to do the process 3 times, but eventually all of the adhesive came off.

I then installed a new carbon fiber spoiler from RPM Tesla (as andrewsjra recommended). I am extremely happy with it . It has a glossy finish, which IMO looks better than the OEM spoiler from Tesla. Plus it was about $170 cheaper than the OEM spoiler.

A few days after I installed it and after it was fully cured, I applied a Gyeon ceramic coating to protect it and prevent future delamination.

If you are thinking of replacing your spoiler installed on top of PPF, here are two other suggestions for you:

1) Be mindful of the temperature for the next 3 days after you install the spoiler. The 3M Adhesive Tape needs 72 hours to fully cure. I applied my spoiler when it was 65 and sunny, but the temps dropped down to 40 at night. Luckily the spoiler seems ok, but I would probably wait until both the daytime and nighttime temps were a bit higher.

2) Do not use a flathead screwdriver to try to remove the adhesive. I tried this and proceeded to put a small hole in my PPF. Luckily it is very small and is now covered by the new spoiler.

If anyone has any questions about this process, you are welcome to PM me.

And thanks to everyone who helped me out earlier.
Joe

Pic of the adhesive left behind by the original spoiler:

IMG_6848.jpg


The old spoiler:

IMG_6807 (1).jpg


The new RPM Tesla spoiler:

IMG_6894.jpg


IMG_6888.jpg
 
Out of curious, if car is still under warranty and spoiler is bad like joebruin77's one, Tesla should replace it?
I have 2023 and is already getting bad
As Adam3 said, the spoiler is covered under warranty but my Tesla is 5 years old and out of warranty. Plus, my spoiler was installed on top of PPF. Back in 2018, when I took delivery, the spoilers were in short supply and I had to wait several months for mine. So I had to install it on top of my PPF.

The Tesla tech at the SC said they could not guarantee the PPF would not be damaged if they replaced the spoiler. That’s the main reason I wanted to do it on my own.
 
Quick update. I successfully removed my old, delaminated spoiler using GreenHokie's suggestion of 20 lbs fishing line, and installed a new replacement spoiler (see before and after pics below).

Removing the spoiler was relatively easy. The hardest part was removing the old adhesive (see first pic below). I used a hair dryer to heat up the adhesive and tried different chemicals to remove it (WD40, IPA wipe). At first, I couldn't remove all of the adhesive on the PPF. I emailed Xpel customer service and they recommended a product called Rapid Remover Adhesive Remover for Vinyl Wraps. I was about to order it when I remembered a professional detailer once told me that you can use alcohol-based hand sanitizer to remove tree sap. I figured it might work for adhesive. I applied the hand sanitizer to the adhesive, let it dwell for about 5 minutes, and then rubbed it off with a clean microfiber. I had to do the process 3 times, but eventually all of the adhesive came off.

I then installed a new carbon fiber spoiler from RPM Tesla (as andrewsjra recommended). I am extremely happy with it . It has a glossy finish, which IMO looks better than the OEM spoiler from Tesla. Plus it was about $170 cheaper than the OEM spoiler.

A few days after I installed it and after it was fully cured, I applied a Gyeon ceramic coating to protect it and prevent future delamination.

If you are thinking of replacing your spoiler installed on top of PPF, here are two other suggestions for you:

1) Be mindful of the temperature for the next 3 days after you install the spoiler. The 3M Adhesive Tape needs 72 hours to fully cure. I applied my spoiler when it was 65 and sunny, but the temps dropped down to 40 at night. Luckily the spoiler seems ok, but I would probably wait until both the daytime and nighttime temps were a bit higher.

2) Do not use a flathead screwdriver to try to remove the adhesive. I tried this and proceeded to put a small hole in my PPF. Luckily it is very small and is now covered by the new spoiler.

If anyone has any questions about this process, you are welcome to PM me.

And thanks to everyone who helped me out earlier.
Joe

Pic of the adhesive left behind by the original spoiler:

View attachment 1008681

The old spoiler:

View attachment 1008683

The new RPM Tesla spoiler:

View attachment 1008684

View attachment 1008685
Looks great, Joe. Better than if a “pro” had done it! Well done!! 👍
 
1. Repairing and repainting your carbon fiber spoiler can be a viable option to restore its appearance and protect it from further deterioration. Here are some steps and suggestions to consider for the repair process:
  • Prepare the Surface: Thoroughly clean the surface of the spoiler to remove any dirt, debris, or old clearcoat. You can use a mild detergent and water solution for this purpose.
  • Sand the Surface: Use fine-grit sandpaper (around 400-600 grit) to sand down the old clearcoat and smooth out any imperfections or rough areas on the surface of the spoiler. Be careful not to sand too aggressively, as you don't want to damage the underlying carbon fiber.
  • Apply Primer: After sanding, apply a high-quality automotive primer to the surface of the spoiler. The primer will help the new clearcoat adhere properly and ensure a smooth finish.
  • Choose Clearcoat Paint: Select a clearcoat paint specifically designed for automotive applications. Look for a clearcoat that is UV-resistant and provides long-lasting protection against environmental elements. Spray-on clearcoat paints are often preferred for their ease of application and smooth finish.
  • Apply Clearcoat Paint: Follow the manufacturer's instructions for applying the clearcoat paint. It's essential to apply multiple thin coats rather than a single thick coat to achieve a smooth and even finish. Allow each coat to dry completely before applying the next one.
  • Protect Surrounding Areas: To prevent overspray from getting on the rest of the car, carefully mask off the surrounding areas with painter's tape and plastic sheeting. Make sure to cover any areas that you don't want to be painted.
  • Final Touches: Once the clearcoat paint has dried completely, carefully remove the masking tape and plastic sheeting. Inspect the spoiler for any imperfections or areas that may need additional touch-ups, and make any necessary corrections.
By following these steps and using high-quality materials, you can effectively repair and repaint your carbon fiber spoiler, restoring its appearance and protecting it for years to come. If you're unsure about any aspect of the process, consider consulting with a professional automotive painter for guidance and assistance.

2. If you're considering replacing your carbon fiber spoiler, we invite you to explore our selection of Tesery spoilers and find the perfect option for your Tesla Model 3. Our team is here to assist you with any questions you may have and ensure you find the right spoiler for your needs.

While repairing and repainting your carbon fiber spoiler is certainly an option, another alternative you may want to consider is replacing it with a new spoiler from Tesery. Here are some reasons why a Tesery spoiler could be a great choice for your Tesla Model 3:

  • High-Quality Materials: Tesery spoilers are crafted from premium materials, ensuring durability and longevity. Our spoilers are designed to withstand the elements and maintain their appearance over time.
  • Exact Fitment: Tesery spoilers are designed to fit your Tesla Model 3 perfectly, providing a seamless and integrated look. You won't have to worry about compatibility issues or modifications.
  • Easy Installation: Our spoilers come with detailed installation instructions and all the necessary hardware, making installation a straightforward process. You can save time and effort compared to repairing and repainting your existing spoiler.
  • Variety of Options: Tesery offers a variety of spoiler options, allowing you to choose the style and finish that best complements your vehicle. Whether you prefer a glossy carbon fiber finish or a painted finish to match your car's color, we have options to suit your preferences.
Enhanced Appearance: A new Tesery spoiler can enhance the appearance of your Tesla Model 3, giving it a sportier and more aggressive look. It's a great way to personalize your vehicle and make it stand out on the road.

Click here to know more:


Yea they'll cover it under warranty
Be careful. I took mine in for this issue and they charged me for it. Maybe sure you have a note in there to call you if it is not going to covered. Car is m3p 2022 40k miles. Took it in few months ago. Really put a bad taste in my mouth Tesla service. I'm sorry this should not happen on a 1.5 year old car. They denied coverage as I had higher than average milage.
 

Attachments

  • 20240117_081701.jpg
    20240117_081701.jpg
    304.2 KB · Views: 4
Be careful. I took mine in for this issue and they charged me for it. Maybe sure you have a note in there to call you if it is not going to covered. Car is m3p 2022 40k miles. Took it in few months ago. Really put a bad taste in my mouth Tesla service. I'm sorry this should not happen on a 1.5 year old car. They denied coverage as I had higher than average milage.
How strange... they gave me a new one for free. If you are under warranty they should have covered it (I would think)...
 
Be careful. I took mine in for this issue and they charged me for it. Maybe sure you have a note in there to call you if it is not going to covered. Car is m3p 2022 40k miles. Took it in few months ago. Really put a bad taste in my mouth Tesla service. I'm sorry this should not happen on a 1.5 year old car. They denied coverage as I had higher than average milage.
I think you had a bad luck with it. Mine is 2023 with 35k miles and I just did the warranty repair on my spoiler with no charge. The tech said it is well known issue and he had done many spoiler replacement services already
 
  • Like
Reactions: Adam3
I think you had a bad luck with it. Mine is 2023 with 35k miles and I just did the warranty repair on my spoiler with no charge. The tech said it is well known issue and he had done many spoiler replacement services already
Do you have a pic of your bad spoiler by any chance? I'm curious if mine will qualify for warranty repair. It is starting to fade in a few areas.
2023 only 11k Miles
 
Do you have a pic of your bad spoiler by any chance? I'm curious if mine will qualify for warranty repair. It is starting to fade in a few areas.
2023 only 11k Miles
Mine is obviously peeling on the clear coat, not as bad as OP's but tech didn't even question about how I drive or what mileage I have
 

Attachments

  • PXL_20240320_235359943.jpg
    PXL_20240320_235359943.jpg
    360.4 KB · Views: 1
  • PXL_20240320_235354375.jpg
    PXL_20240320_235354375.jpg
    370.8 KB · Views: 1
  • PXL_20240320_235416893.jpg
    PXL_20240320_235416893.jpg
    407.5 KB · Views: 1
  • PXL_20240320_235406729.jpg
    PXL_20240320_235406729.jpg
    338.7 KB · Views: 1