Welcome to Tesla Motors Club
Discuss Tesla's Model S, Model 3, Model X, Model Y, Cybertruck, Roadster and More.
Register

Another audio upgrade thread for UHFS (2016)

This site may earn commission on affiliate links.
I have a UHFS on my 2016 (pre-refreshed) Model S and wasn't happy with the sound and wanted to used my old Focal K2 3 way setup FRONT that I had on my previous ICE car (2013 Nissan GTR). This is my daily driver/family car so I didn't want to fully disconnect rear speakers since my kid sits in the back. Thus, I only wanted to add 3 way front setup. Only the front doors, Left&Right front mids & tweets were removed.

Audio equipment:
  • Focal K2 Tweeters (# TNK) - saved from my previous install.
  • Focal K2 3inch midrange - I had an old 4inch and that will not fit. I had to sell that I buy a brand new 3inch. This barely fits and I couldn't screw it down. I see now why some use the 2.5 inch Audiofrogs.
  • Focal passive Xover from my previous setup that came with the Tweeters & midranges.
  • AudioFrogs GS8ND2 - I originally bought Audio Development W800 Neos. I couldn't fit these even with a special/custom bracket from this company in FL (2012-2020 Tesla Model S Custom Door Speaker Adapters). I wasn't willing to shave my doors or the basket on the Neos.
  • Helix DSP.3s - I had to purchase this.
  • WIFI controller for Helix - I had to purchase this. I can use my phone to make adjustments to Helix w/o a laptop if I wanted to.
  • HEC USB Audio card for Helix - I had to purchase this. For future lossless streaming service like Apple Music from my phone for quality audio.
  • URC.3 knob controller for HELIX - I had to purchase this. I can drive and not have to look at my phone to adjust the Helix volume. Remember that my rear doors, rear tailgate and center channel are still working. This knob is to crank up my 3-way components.
  • Arc Audio XDI 1100.5 amplifier - used from my previous car. 5 channel amp.
  • JL Audio CS110LG-TW3 - had to buy (Crutchfield)
  • Positaps and other various wire taps and connectors (of varying gauges)
  • 14 guage and 16 gauage wires (find multi conductor ones so you don't have to run again) but I made sure my wires were not CCA but OFC wires.
  • 4 guage power wire from Knuconceptz along with fuse holder
  • I reused my two power distribution blocks for positive and negative connection
  • 8 conductor wires for signal - West Penn Wire 3271-8 Conductor 22 Gauge Shielded Cable CMR
1662803644689.png

Bought various gauges of speaker wires, amplifier power/ground wire (from Knuconceptz) and used some leftover parts from previous audio installs and connectors from Mouser electronic (which I did get to use).

I DIY this and didn't pay a shop for the initial installation but might pay a shop to build a nicer amp rack.

Homework on signal from factory HU (head unit):
The biggest pain/issue was trying to get the signal out from the MCU (I have MCU1). The audio tech diagram for line-out was useless for me.
1662801776150.png

I could not get any signal from the lineout. I spent a week buying parts to build (use pin removal tool and solder) a custom Y connector between the 2nd OEM amp so I could tap the signal. I didn't want to cut/tap any OEM wires. I used the Tesla shop manual to buy AMP brand connectors from Mouser electronic.
1662801943652.png

The above Y connector was a waste of my time. No audio signal could be detected from any of the LINE OUT channels at X427 connectors. I tried pins VE+ and VE- (pin 1 & 11) along with signal ground (pin 2) and tried using chassis ground. I spent a week on the DIYMOBILE forum to get help and the members offered suggestions. None of the suggestions work. I gave up and had to tap speaker level. I am not saying it's not impossible to use LINE level OUTPUT but I am just not smart enough to figure it out.
I know see why none of the famous audio installers that have worked on Model S with UHFS has ever used the LINE level out.

Which speakers to tap for full range? This is the million dollar question that audio installers were willing to divulge with good reasons.
I did read an old thread (External Amplifier adapter for Tesla) but had to test to make sure that this person was correct.
EXYBKdvMCJeXRFnSUrKyad0Q-Mir8F6gq6tmCEo5NbzlhhB56FnnO3S-WXZa2-IO0p-wXHhcmNgl0w0lJEq28MwvYpaJMZbXaJp7NY_RhTvppEaRHAyBiLMcjgzoyfohN_sNOsDSEKwhLm-MaCDs1CN6LIgxVIVO6ZrLlxmaXm9AXLSfcLiL0368kw


Using my HELIX DSP, I tap into the rear speakers, front door and OEM midrange. I used a 20hz-20kHz and pink noise file to see a signal with Helix on what frequency response reproduction for each speakers. The person in the thread (above) is correct. The OEM midrange wasn't needed.
You only need the rears and combine with front doors (at least on the UHFS) to get full range (minus subwoofer out).

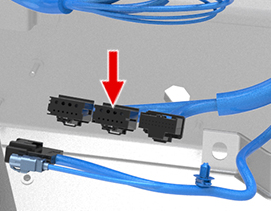
Tap into #3 & 15 for LEFT front door & # 4 & 16 for right front door on connector X423.
bUI9AylsrbOGaHN9b2-zk9LwjghCo0zjzPR7gB1E6nOekVbR81W7efVrKuyAfnPsKMtaMqtFp24_vh-q3GX54z-ZqvrUpqkLw1PGHmLozM_yzlEPhquLAd4KI_IyNtQVY1qFbMnM4CycKEhk67UCOWY

Tap into #9 & 10 for RIGHT rear door & #5& 6 for LEFT rear door on connector X426
Fcegwg9LxIUfBAdBCj1fW6uqGjNLyQTMO80llk46bgLc-d0pGuSoxSV_sIFVDQenFeg7qzOmwe9J5Nz316zjSDL3eGmTN08TsjkRZQh275zp2vcHjKTaUvHsLT7YId0JrMFhM5E8q5_acaucLYXBnCHuBFVNsN8gmf0VCo0SPbVeMZ8fEkhUyQzGMg

Subwoofer signal: I used X422 connector which is located in the trunk (this would have been connected to the OEM sub which I disconnected).

Power Management and wires
Running power wire from the frunk battery, I followed the instructions from Teslatap. I ran it down the passenger side to the trunk.
I ran 8 conductor wire as my signal from the trunk to the driver side footwell.
I ran 4 conductor wires (14 gauge) on each side of the car since these would power my 8inch midbass, midrange & tweeters.
(Hindsight, I wish I ran another pair of wires) since now I want to run full 3 way active but that's next year's project).

Note, the only cutting into OEM wire that I had to do was for the front door speakers because the stupid pin removal tool didn't work on connector X943/X944.

Trunk:
Everything (including the subwoofer) such as my amp and Helix DSP is located in the lower trunk). I can completely closed this and can feel the sub from the driver seat.
Please excuse the wiring mess. This will be eventually cleaned up next year.
1662803944444.png
1662803958688.png


I might be forgetting some steps so please ask since this is still fresh in my head.

Lesson learned if you attempt to do this yourself:
DO NOT, I repeat DO NOT unplug any connectors from the MCU and close all of your doors. Apparently, the MCU allows you to remotely unlock the doors and locally lock doors and bunch of other stuff to LET you back into the car.​
I left it unplugged while tinkering with it and shut all of my doors. I wasn't able to get in. I had to pay a company to "break" into my Tesla (is someone that Tesla emergency service recommended/called for me). All they did was used a inflatable wedge to create an opening in the window and used a long pry tool to yank the door lever inside. It took her 3 minutes to unlock my car and she told me that she's done this before on other Teslas. It was a $150 bill. I'm thinking of buying that tool from Amazon for $50.​
This story isn't done. Once I gain access and plugged back my MCU, nothing worked. Luckily, I knew how to gain access to my frunk (remove your nosecone) and jump my 12V battery. Viola, everything came back to life !!!​
The car still needs to be tuned properly with the Helix DSP via laptop w/ USB microphone. But then I just realized that I can't do true time alignment on each speakers since not all of my speakers are fully active. My tweeters and mids are bundled together with a passive crossover. If you're going to for a 3 way front build, go full active on all components !!!​
That's going to be a next year project (my wife wants me to work on the deck and utility room) where I run another pair of speaker wires and USB cable since I just recently purchased a HEC USB audio card for my HELIX. This will allow me to play Apple music or any lossless streaming music from my phone directly into the Helix. I had ran an optical cable from the front of the car to the Helix but I can't seem to get any optical adapter to work my Android phone. So, I might have to scrap and pull out the optical cable and replace it with USB cable.​
Signal quality from MCU.
It's not the best since it's not LOSSLESS quality unless you buy/rip a bunch of FLAC files onto your USB drive. Who has time for that? I even downloaded/paid for some sample FLAC files (16 and 24 bit) and can't quite tell the difference between the MP3 version against the FLAC version. I think with a proper tune, I might be able to tell a difference.​
Anyways, I wanted some digital quality signal into the HELIX instead of speaker level from the MCU and decided to use the USB HEC card to add to my HELIX isntead of using a bluetooth card (APTX). I would have to pair my phone's audio at the same time with the Tesla and not sure how that would work in terms of handling phone calls, etc.
Airbag warning light
I should have powered the car down and waited before disconnecting the passenger dash air bag. Now, I have a perpetual airbag warning light. Eventually, I will pay Tesla $200 CAD to clear this but then debating on "renting" their diagnostic tool for ~$300 USD/mos ($500 CAD/mos)? However, I have no idea what the learning curve is for this tool and only have a month to use it. I might ask this forum if anyone has this diagnostic tool in my area that's willing to clear my airbag and I'll pay (obviously not $150 USD since that's what Telsa charges).​

Proper storage of old speakers
I had stored the Focals speakers in a box in my basement for 2 years. Dumb mistake, do not store speakers upside down directly onto a flat surface. It need to be stored in it's original box (if possible) or in foam/bubble wrap where the surround isn't pressed against a flat surface. My 6.5 Focal K2 speakers were no good, the voice coil seized up and surround was "warped" and bubbly. I was try to resell my 6.5 Focals so that I money can fund my 8inch midbass. Only one 4inch midrange was good. The tweeters were fine (bubble wrapped but it wasn't made the same like the other speakers).​
Hard lesson to learn...$$$.​

Tools:
I bought stuff for this install that I probably won't use again but none of the tools were than expensive.
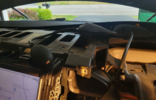
I had a quote of $2500 USD for labor for an install like this. I felt that I was justified in buying the inflatable tool to pop up my dash along with a few crimpers, etc. Then again, I probably didn't NEED to remove the entire upper leather dash to get to my 3inch midrange. LOL.

Some install photos:
1662804855412.png
1662804965774.png
1662804894025.png
1662804941674.png

Sorry but I reached my max 10 files limit for this thread.


Phase 2 (next year):
  • Run new speaker wires for full active. DIY
  • Remove optical cable DIY
  • Run USB wire for my phone to play Apple music directly into the Helix DIY
  • Get installers to build a nicer amp rack, button up the power connection to my battery, tidy up wires in the trunk.
  • Tune the Helix by a pro instead of me buying an expensive microphone that I will use once to just tune. The tuner quote me $100/hour but they probably know what they're doing.
 

Attachments

  • 1662804808889.png
    1662804808889.png
    1,011.3 KB · Views: 116
Nice install. I have always heard to leave the front windows down if you're disconnecting things so you can use the mechanical door latch to get into the car. When I installed my mids and unplugged the airbag to get the dash pad off, I didn't get an airbag light. Maybe I got lucky?

Good tip on going active on the front stage. I was talked into an Audison AP8.9bit amp/dsp by my installer and I'm glad for it. It gave me the freedom to swap out individual components and tune for them when I decided to upgrade the speakers down the road. I used the same speaker brackets. I also run the AudioFrog mids you mentioned (GS25s). They indeed just drop in and sound great.

What shop wanted to charge you $2500 for an amp install? I think I got out for $800, and that included a simple amp rack and wiring materials to install two amps. I did the speaker and sub installation myself.

If you think you're done upgrading speakers and you can get a tune from a pro for a couple hundred bucks, I would do that. I bought a good mic and attempted to tune with REW. It's better than what I started with, but I think I'm still leaving a lot on the table. Still sounds pretty good though!

I would highly recommend adding sound damping material to your next phase. It's time consuming but not all that difficult or expensive to do yourself, and it really helps kill a lot of annoying buzzes, rattles, and resonances. At least tackle the front doors and the hatch.
I think I've read your installs before with Audiofrogs and I was referring to your post about your 2.5 Audiofrogs for the midrage was easy drop in. I was just trying not to buy more speakers and reuse existing ones but that didn't got well. I assume your installer used speaker level outputs instead of LINE level outs?

It was a shop in GTA (Greater Toronto area) with Tesla experience. ~$2500 CAD was for installing amps, speakers and DSP. I would still need to provide the main parts or buy it through the audio installer.

The closest audio installer (Vanguard Auto Design owned by Nick who is very knowledgeable and I have no idea how they manage to install AD W800 Neos on the doors of that Model S) with Tesla experience is ~7 hours away in NYC while Toronto is only 2 hours away. None of the audio shops in Buffalo NY (where I live) has any Tesla experience and doesn't even want to touch my car.

Yes, forgot to add that (sound dampening) as part of my phase 2. I bought sound dampening materials and meant to put it on the front doors and trunk but I was pretty damn tired/burnt out by that time since I just wanted things to work and I was driving around with my dash open for 2 weeks. I think I might hire someone to do that since I don't know how to mount that heavy sheet on the doors.
 
Yes my installer used speaker level outputs. I am color blind so I knew finding the right wires to tap was going to be a crapshoot with a multimeter, so I punted to a shop.

I've had some conversations with Nick on DIYMA. He and Vanguard seem pretty well sorted. A 7 hour one-way trip along with an inevitable overnight (or longer) stay is pretty steep though.

Applying sound damping material can be pretty time consuming, but it's also very satisfying to squash annoying rattles. The BCM on the passenger door was especially rattle prone in my car, and it's nice to not hear it buzz with every kick drum now. Even doing a ham-fisted job like I did will improve things dramatically, but tracing out a template and transferring it to a single sheet of material is even better. CarAudioFabrication on YT has a number of good videos on applying sound damping material.
 
siamnet - Likely not important now, but you almost had it right for line-level outputs. These are "balanced” signals, similar to some very high-end audio systems. I expect you thought they were unbalanced, typical of most audio gear. Balanced audio is far less susceptible to various noise and interference that may be induced from adjacent wiring.

You can use an adapter to convert balanced to unbalanced. I explain in more detail here, along with connection points when I added a sub-woofer to my 2013 S that didn't have UHFS. Sub-woofer and Amplifier Installation – TeslaTap See part 3 for specific details.
Per your instructions on this page: Part 3: Amplifier Installation – TeslaTap , could you please explain this portion or if this what you were referring to?

1662897487933.png


If I were to read what you wrote for the Ultrasound instructions, it seems that I would need to use all three wires from a line level out? For example, if I were to pick channel1, there are 3 wires (pin #1 which is (+) and pin # 11 which is (-) and then pin #2 (signal ground).


That was the only thing that I didn't try since I tried the following combo (from X427 connector) for example on channel 1:
  • initially I wired pin # 1 and #11 to an RCA's two wires;
  • next tried pin #1 and pin #2(signal ground) to the RCA's two wires;
  • next tried pin #1 and chassis ground to the RCA two wires.

Do you know if channel 1 and channel 2 (front right & left) on the line out have full range?
Its weird that the output from the 2nd OEM amplifier for the front door speakers seems to only play below a certain frequency as it's already been high passed with a crossover. I am not sure if the signal is already high-passed before going to the 2nd amp or after. Even if I was able to use the line out, I was still hesitant on whether if channel 1 & 2 were going to be full range or not.

Thank you.
 
I did this 8 years ago and used option 1. Re-reading it, I'm very doubtful my ideas for options 2/3/4 will work and I didn't try them. I'll update the article. A balanced line level really needs to be converted to an unbalanced line when going to vehicle audio amps that also have unbalanced inputs. I'd guess 99% of vehicle audio amps use unbalanced input. Perhaps some very esoteric (i.e. expensive) amps might support balanced inputs with XLR connectors. RCA connectors are not normal for balanced signals, but the JL Audio converter used them and they worked fine.

I only used these line-level connections for the subwoofer, but I did not test if these were full frequency. My subwoofer amplifier had a built-in frequency cutoff. I don't see why Tesla would filter them as they were intended to be connected to the optional amp with full bandwidth, or in your case, the UHFS amplifier.

Anyway, I hope that helps!
 
Yes my installer used speaker level outputs. I am color blind so I knew finding the right wires to tap was going to be a crapshoot with a multimeter, so I punted to a shop.

I've had some conversations with Nick on DIYMA. He and Vanguard seem pretty well sorted. A 7 hour one-way trip along with an inevitable overnight (or longer) stay is pretty steep though.

Applying sound damping material can be pretty time consuming, but it's also very satisfying to squash annoying rattles. The BCM on the passenger door was especially rattle prone in my car, and it's nice to not hear it buzz with every kick drum now. Even doing a ham-fisted job like I did will improve things dramatically, but tracing out a template and transferring it to a single sheet of material is even better. CarAudioFabrication on YT has a number of good videos on applying sound damping material.
Beatle, where exactly do you apply the sound dampening in the hatch? I have some resonance with some songs from the subwoofer.
 
Apply where the resonances are. :) I took the plastic off the hatch and tried to reach as much of the inside as I could with RAAMmat and ensolite. Expect to break at least a few plastic clips. You can also wrap the clips with Tesa tape (not Tesla tape) to reduce rattles. I still didn't get everything, but it's much better. There are also interior pieces that can be removed in the hatch that hide more sheetmetal.
 
  • Like
Reactions: siamnet
I think I've read your installs before with Audiofrogs and I was referring to your post about your 2.5 Audiofrogs for the midrage was easy drop in. I was just trying not to buy more speakers and reuse existing ones but that didn't got well. I assume your installer used speaker level outputs instead of LINE level outs?

It was a shop in GTA (Greater Toronto area) with Tesla experience. ~$2500 CAD was for installing amps, speakers and DSP. I would still need to provide the main parts or buy it through the audio installer.

The closest audio installer (Vanguard Auto Design owned by Nick who is very knowledgeable and I have no idea how they manage to install AD W800 Neos on the doors of that Model S) with Tesla experience is ~7 hours away in NYC while Toronto is only 2 hours away. None of the audio shops in Buffalo NY (where I live) has any Tesla experience and doesn't even want to touch my car.

Yes, forgot to add that (sound dampening) as part of my phase 2. I bought sound dampening materials and meant to put it on the front doors and trunk but I was pretty damn tired/burnt out by that time since I just wanted things to work and I was driving around with my dash open for 2 weeks. I think I might hire someone to do that since I don't know how to mount that heavy sheet on the doors.
Hey man, I was just strolling through this forum and your post caught my attention. I actually work at Vanguard Automotive Design as the main audio technician. I own a Model S as well. Nice to see your thread. Good luck!
 
  • Like
Reactions: siamnet
Yes my installer used speaker level outputs. I am color blind so I knew finding the right wires to tap was going to be a crapshoot with a multimeter, so I punted to a shop.

I've had some conversations with Nick on DIYMA. He and Vanguard seem pretty well sorted. A 7 hour one-way trip along with an inevitable overnight (or longer) stay is pretty steep though.

Applying sound damping material can be pretty time consuming, but it's also very satisfying to squash annoying rattles. The BCM on the passenger door was especially rattle prone in my car, and it's nice to not hear it buzz with every kick drum now. Even doing a ham-fisted job like I did will improve things dramatically, but tracing out a template and transferring it to a single sheet of material is even better. CarAudioFabrication on YT has a number of good videos on applying sound damping material.

I didn't even use the color code of the wire since they do not 100% correspond to the official Tesla wiring diagram.

Nick told me that I would need to leave my car with him for a week or more. It wasn't something that could be done over a weekend. So, that's why I decided to DIY it myself. I think most shops with Tesla experience will tell you the same thing for a full 3 way install that it's not something that can be done over a weekend.

i think
Hey man, I was just strolling through this forum and your post caught my attention. I actually work at Vanguard Automotive Design as the main audio technician. I own a Model S as well. Nice to see your thread. Good luck!
I was talking to Nick earlier this summer and I thought it would take just a weekend for my car but he told me that he doesn't work on weekends..lol. And that it would take more than 2 full days to complete and I can see why it would take longer since his builds are incredible, the attention to detail. I have no idea how he/your shop was able to stuff AD W800 Neos in the front door !!!
I actually watched one of his youtube video on Helix tuning (on a jeep or something) and that really helped me.
 
Apply where the resonances are. :) I took the plastic off the hatch and tried to reach as much of the inside as I could with RAAMmat and ensolite. Expect to break at least a few plastic clips. You can also wrap the clips with Tesa tape (not Tesla tape) to reduce rattles. I still didn't get everything, but it's much better. There are also interior pieces that can be removed in the hatch that hide more sheetmetal.
I bought Tesa tapes and bought replacement clips (not from Telsa but Toyota ones since one of the threads said that they're similar). That's a good tip to wrap the Tesa taps on the metal clips !!! I was only using Tesa tapes to wrap my speaker wires together in a nice bundle in addition to using zip ties.

Regarding the front doors, I didn't undo/break the retention straps on the doors since Tesla's procedure state that it is a one time use only and I didn't feel like breaking it since I had enough clearance to get to the speakers.
1662979509769.png
 
I did this 8 years ago and used option 1. Re-reading it, I'm very doubtful my ideas for options 2/3/4 will work and I didn't try them. I'll update the article. A balanced line level really needs to be converted to an unbalanced line when going to vehicle audio amps that also have unbalanced inputs. I'd guess 99% of vehicle audio amps use unbalanced input. Perhaps some very esoteric (i.e. expensive) amps might support balanced inputs with XLR connectors. RCA connectors are not normal for balanced signals, but the JL Audio converter used them and they worked fine.

I only used these line-level connections for the subwoofer, but I did not test if these were full frequency. My subwoofer amplifier had a built-in frequency cutoff. I don't see why Tesla would filter them as they were intended to be connected to the optional amp with full bandwidth, or in your case, the UHFS amplifier.

Anyway, I hope that helps!
Yes, it did. Your article helped with running the power wire through the firewall and explained how the speakers work in a UHFS system. I did read on another thread on this forum that someone made an audio harness that went into a JL Audio FIX88/86. Based on his picture, it looks like he was using Line Outs. As you wrote, maybe JL Audio prodcuts would work w/o much of hassle with the Line outs from the MCU.

I was considering buying a JL Audio FIX 86/88 based on that thread but then the Audio forums (DIYMOBILEAUDIO) told me to go with Helix for superior DSP and reliability instead of JL Audio products.
 
I never had a problem with JL Audio, but they did seem to be on the mid-to-cheap end of the audio spectrum. I figured for a subwoofer, it was fine as DSP is not really needed. Helix is clearly a step up and looks to have some great products.
 
  • Like
Reactions: siamnet
Hey guys I have access to pretty much changing the base audio of my car to premium sound. This changed the mcu output a lot. I made a custom harness that plugs into the green porrtiion under neath the mcu where preimuim audio would be if you purchased it from the factory. I followed the instructions from the guy who said what lines to follow to where and we tried it and you are right. But it only applies to the base audio and none of the other channels. Let me tell you though that the bass is completely better when premium sound is turned on. Any one know how to get the other channels to work??
 
Hey guys I have access to pretty much changing the base audio of my car to premium sound. This changed the mcu output a lot. I made a custom harness that plugs into the green porrtiion under neath the mcu where preimuim audio would be if you purchased it from the factory. I followed the instructions from the guy who said what lines to follow to where and we tried it and you are right. But it only applies to the base audio and none of the other channels. Let me tell you though that the bass is completely better when premium sound is turned on. Any one know how to get the other channels to work??

So, let me try to understand.
You have a base audio system (connector X426). You are attempting to use the vacant slot (X427) of the MCU as line out. And somehow, you're able to enable (via software?) the output of X427 which would have gone to the 2nd OEM amp (part of UHFS). And you were ONLY successful at utilizing the bass line out of X427 but none of the other line out work?
1667554004973.png
 
So, let me try to understand.
You have a base audio system (connector X426). You are attempting to use the vacant slot (X427) of the MCU as line out. And somehow, you're able to enable (via software?) the output of X427 which would have gone to the 2nd OEM amp (part of UHFS). And you were ONLY successful at utilizing the bass line out of X427 but none of the other line out work?
View attachment 870948
Exactly! Well said. I only can get the bass working
 
Exactly! Well said. I only can get the bass working

That is still amazing since I couldn't get any of the line out to work going into my Helix DSP. Are you using a JL Audio FIX or JL Audio TWK product?
I would assume that is probably why no one is responding, due to the lack of experience in what you're trying to do or whoever did it no longer owes a Tesla and doesn't monitor these threads.
I do not I have a rock ford fosgate sound Processor and a nvx amp. But the bass sounds so good. I wish I could get other channels to work