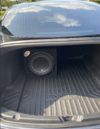
Hello all! I recently installed a JL Audio 12w6v3 along with an Audio Control LC800.1 and figured I make a post describing I went about the installation. One of the issues I ran into while research how do install a aftermarket subwoofer is the lack of documentation on how to do so with the exception of people used an NVX kit.
Overall, I'm satisfied with the system. I often listen to bass heavy music and found that the premium audio system struggled to play lower bass frequencies, with this system it compliments the front stage very well while providing the extra thumb that I was looking for. In the future, I'd like to build a ported box that sits flush in the trunk boot but I only had a couple hours to complete this install which resulted in me using an enclosure from my old vehicle.
Connecting the subwoofer:
In my case I had the premium audio system so it was as simple as tapping the subwoofer cable using an adapter I purchased from someone on eBay. From there I ran the speaker outputs into my Audio LC800.1 (it accepts high level inputs)
Powering the amp:
I ran power from the penthouse under the backseat. People have said this was problematic but I've no issues with it. There are a few steps I would recommend to prevent any potential issues:
- Shutting down the entire 12v system
- Getting used to interacting with the 12v system (shutting off, rebooting etc)
Getting a turn on signal is often the hardest part, in my case I completely bypassed this by wiring a manual turn on switch. It was a simple switch where the source wire went to the 12v source and the switch wire went to the remote signal on my amp. It isn't perfect but it beats having to try and find a 12v source in the car who's functionality may change due to a software update.
Troubleshooting:
Having a circuit breaker was helpful as it allowed me to shutoff the connection to the amp manually. On initial turn on everything I was greeted by messages saying "Unable to maintain power" this was solved by disconnecting the negative terminal on the battery as well as the connector on the penthouse. I found that when doing a software update I needed to shut off the amp, complete the update, turn the amp back on and then restart the 12v system. This is somewhat of a pain but a fair trade in my opinion.
Part List:
1. 2x 6ft 4awg Battery Wire
2. LENKRAD 140 Amp Marine Circuit Breaker
3. 4x 4awg Ring Terminals
4. AudioControl LC800.1
5. JL Audio 12w6v3
Hopefully this helps anybody out hoping to do the same thing. There is some information regarding how to do it but when I was searching around I had to bookmark different threads and it would have been helpful to have a post thread like this detailing how to do the install.