


Welcome to Tesla Motors Club
Discuss Tesla's Model S, Model 3, Model X, Model Y, Cybertruck, Roadster and More.
Register
Install the app
How to install the app on iOS
You can install our site as a web app on your iOS device by utilizing the Add to Home Screen feature in Safari. Please see this thread for more details on this.
Note: This feature may not be available in some browsers.
-
Want to remove ads? Register an account and login to see fewer ads, and become a Supporting Member to remove almost all ads.
You are using an out of date browser. It may not display this or other websites correctly.
You should upgrade or use an alternative browser.
You should upgrade or use an alternative browser.
cubby removal - anyone know how?
- Thread starter zero mpg
- Start date
-
- Tags
- Model S User Interface
I want my cubby out, anyone know how it is attached? Ideally, non-destructively :wink:
My car came without it so it is removable. I'm not sure Tesla makes the original piece that fit in its place anymore though.
gg_got_a_tesla
Model S: VIN 65513, Model 3: VIN 1913
I want my cubby out, anyone know how it is attached? Ideally, non-destructively :wink:
Why would you?! Is it in the way of something? It's not even seen really from the front seats...
NigelM
Recovering Member
I want my cubby out, anyone know how it is attached? Ideally, non-destructively :wink:
Pull it down and then out at the same time, it's held in by metal spring clips. Be careful there are comm ports for diagnostics under there that will drop down and look like loose wires with something similar to an RS32 on the ends.
if you want to remove it completely you'll need to replace it with a cover or something.
It's not an aesthetics issue ... it's taking up valuable space that I'm going to use for a "purpose-built" custom console. I've been waiting since November '12 to see what Tesla and other third parties come up with and neither are going to 'meet my needs'. Given that I'm designing for me, I'll be able to do things you couldn't from a mass market perspective; e.g., two cupholders side by side that will hold 32oz cups without touching each other and a 6-7" insulated hole between/overlapping the two for a 20/24oz bottle of diet dew (and yes it is an either/or deal at time of usage). Other features include a 'garbage can', umbrella holder, 1772 charging adapter holder, functional phone holder (think angle and arm length), radar detector control/display, iPad slot, sunglass holder, wallet/cash/card bay, pen holder, laptop shelf, and a spot for some notecards. I am nuts, but I think I can get it all engineered efficiently and modular. I'm sure you are wondering why ... outside of the obvious features, there are days where I will spend 3+ hours on calls in the car (parked) and need access to iPad/laptop, etc. I like the fact that Tesla has given us generous open space to play withWhy would you?! Is it in the way of something? It's not even seen really from the front seats...
") and I appreciate you guys responding in short order - 5.5 hours from post to solution ... awesome.
and I appreciate you guys responding in short order - 5.5 hours from post to solution ... awesome.artsci
Sponsor
Pull it down and then out at the same time, it's held in by metal spring clips. Be careful there are comm ports for diagnostics under there that will drop down and look like loose wires with something similar to an RS32 on the ends.
if you want to remove it completely you'll need to replace it with a cover or something.
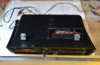
These two photos show the spring clips on the front top and rear of the cubby. I ordered a spare to set up a control box for by radar detector, laser jammer, and parking sensors. I'll remove the original, plug in all the connections, and snap this one in place.
Attachments
NigelM
Recovering Member
Note that Tesla service techs may need to access those comm ports under the touchscreen so anything you build in there has to be removable even if it's only for your annual service.
caddieo
Member
1772 charging adapter holder,.
There already is a hollowed-out space in the left side of the glove compartment that appears to be specifically designed for the 1772 adapter.
MarkR
Member
Zero MPG: if you are going to install an umbrella holder in your purpose-built custom center console, I assume you have the pano roof. Please post pix when available.It's not an aesthetics issue ... I'm going to use for a "purpose-built" custom console. I'll be able to do things you couldn't from a mass market perspective; e.g., two cupholders side by side that will hold 32oz cups without touching each other and a 6-7" insulated hole between/overlapping the two for a 20/24oz bottle of diet dew (and yes it is an either/or deal at time of usage). Other features include a 'garbage can', umbrella holder, 1772 charging adapter holder, functional phone holder . . .
I pulled my cubby out today, and I am having a heck of a time getting the rear spring clips properly positioned to re-install. Is there a trick to getting this cubby back in? Please help. I am so stuck!!!!
I ended up taking off the side panels so I could see to position it, not easy to see. Here's a pic of back showing the clip (console removed so now easy to see).
Hezi
Member
I had the same issue this weekend. Very easy. Pry the sides of the center piece under the Cubby (Place pry tool between the leather like material and the inner plastic wall), and than you will have access to a small piece that sits under the cubby. Pry it out, it clipped in and come out easy. Now you have the needed access to reattach the cubby back clips.
Drtadakichi
Member
To reinstall, you will need to pull out the slim trim piece that sits underneath the cubby that holds the top of the carpet in, that will allow you to see the two slots that the back clips go into, then it just pops up. Like a previous poster said though, Technicians need to get to the connector that you can access to there. However a way around this is to pull off the right side hockey stick shaped trim and you can route the connector behind there and still install the trim back properly.
breser
AutoPilot Nostradamus
I am having a hell of a time putting this all back together. We had a little accident with spillage on the yacht floor and I had to take it out to dry out. Taking it apart didn't go perfectly but now I can't get it all back together. I can put the cubby in without the trim below it that holds in the yacht floor, but then I can't put the trim in. If I put the trim in first then I can't put the cubby back in. There has to be some non-obvious trick here.
Dborn
Confirmed
The yacht floor is dead easy. It just drops in and is held by the santoprene bed it sits in. Nothing else holds it in place.
breser
AutoPilot Nostradamus
The yacht floor is dead easy. It just drops in and is held by the santoprene bed it sits in. Nothing else holds it in place.
That doesn't help and isn't true. The Yacht Floor is held in by a trim piece (previously referred to as the hocky stick piece in this thread), this trim piece slides behind and then over the yacht floor at the top of the floor where it ends under the cubby. As I said, I can't get the cubby in with the trim in place and I can't put the trim in place with the cubby in place.
Similar threads
- Replies
- 0
- Views
- 523
- Replies
- 5
- Views
- 238
- Replies
- 0
- Views
- 643