As photos of the interior disassembled are useful for a number of purposes for we modders, I thought it would be useful to post Don Sambrook and Bert Miller's work on sound deadening my Model S. I found these photos incredibly helpful. I've divided these in sections: trunk, floor, doors, front roof, and frunk. The shots are pretty obvious but I've added commentary where appropriate.
Trunk
This is what the factory installs. The blue felt is the sound insulation. It's decent but not effective in wide frequency bands.


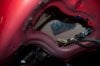
These next photos show the driver's side rear wheel well. Notice both the vents to equalize pressure when the doors are closed and the presence of one dinky factory installed sound dampening squares.

Note the dampening panel installed by the factory over the wheel well. Good for Tesla!

Here more dampening squares have been added by Don and Bet before additional sound deadening materials are added.

Here mass loaded vinyl is being installed to line the entire trunk. The photos the follow show different part of the trunk being lined.


Liftgate
Here's the ubiquitous blue felt material on the back side of the large plastic lift gate panel. Don and Bert added some dampening squares, closed cell foam, and mass loaded vinyl to further sound proof this piece.

Doors
Now we're looking at a front door panel with the interior liner removed.

Here's the back side of the interior liner. The factory has installed some of the felt material for sound deadening. It doesn't show in the photos, but Tesla has also added some dampening panels to the outside door panels. That's good. But Don and Bert added more as they felt it was still too resonant. Note the speaker surround.

Here closed cell foam has been cut to fit over the door panel.

Then a layer of mass loaded vinyl has been added for further sound deadening.

Floor
Here's a shot of the naked floor after the seats and carpeting has been removed. Don and Bert have already added a number of damping panels to the footwell area (Tesla install none there).

A view of the floor with the air conditioning ducts for the rear vents. Don felt these were too resonant so some dampening panels were added.


A dampening panel was added by Don and Bert to the passenger side kick panel.

Mass loaded vinyl was added under the rear seat.

More mass loaded vinyl lining the driver's footwell.

A view of the entire floor covered with mass load vinyl.


Frunk
Closed call foam and mass loaded vinyl were added to the entire floor of the frunk. As Don felt it was too resonant, dampening squares were also added to the interior frunk space.

Front roof
As my car has a pano roof, little could be done. But some dampening panels were added to the front area near the windshield, along with closed cell foam.

The B pillar was fit with 3M Thinsulate.

I have a very hard time believing that all of this was done for $1,900. But it was, and my hat is off to Don and Bert. Bert did a phenomenal job of reassembling everything. One would never know that almost the entire interior was taken apart. Don told me that Bert works completely from memory regarding all of the parts he disassembles when he puts it all back together. That is a special skill in and of itself.
This last photo shows several cameoing panels added to the door skins by Don and Bert.
Trunk
This is what the factory installs. The blue felt is the sound insulation. It's decent but not effective in wide frequency bands.
These next photos show the driver's side rear wheel well. Notice both the vents to equalize pressure when the doors are closed and the presence of one dinky factory installed sound dampening squares.
Note the dampening panel installed by the factory over the wheel well. Good for Tesla!
Here more dampening squares have been added by Don and Bet before additional sound deadening materials are added.
Here mass loaded vinyl is being installed to line the entire trunk. The photos the follow show different part of the trunk being lined.
Liftgate
Here's the ubiquitous blue felt material on the back side of the large plastic lift gate panel. Don and Bert added some dampening squares, closed cell foam, and mass loaded vinyl to further sound proof this piece.
Doors
Now we're looking at a front door panel with the interior liner removed.
Here's the back side of the interior liner. The factory has installed some of the felt material for sound deadening. It doesn't show in the photos, but Tesla has also added some dampening panels to the outside door panels. That's good. But Don and Bert added more as they felt it was still too resonant. Note the speaker surround.
Here closed cell foam has been cut to fit over the door panel.
Then a layer of mass loaded vinyl has been added for further sound deadening.
Floor
Here's a shot of the naked floor after the seats and carpeting has been removed. Don and Bert have already added a number of damping panels to the footwell area (Tesla install none there).
A view of the floor with the air conditioning ducts for the rear vents. Don felt these were too resonant so some dampening panels were added.
A dampening panel was added by Don and Bert to the passenger side kick panel.
Mass loaded vinyl was added under the rear seat.
More mass loaded vinyl lining the driver's footwell.
A view of the entire floor covered with mass load vinyl.
Frunk
Closed call foam and mass loaded vinyl were added to the entire floor of the frunk. As Don felt it was too resonant, dampening squares were also added to the interior frunk space.
Front roof
As my car has a pano roof, little could be done. But some dampening panels were added to the front area near the windshield, along with closed cell foam.
The B pillar was fit with 3M Thinsulate.
I have a very hard time believing that all of this was done for $1,900. But it was, and my hat is off to Don and Bert. Bert did a phenomenal job of reassembling everything. One would never know that almost the entire interior was taken apart. Don told me that Bert works completely from memory regarding all of the parts he disassembles when he puts it all back together. That is a special skill in and of itself.
This last photo shows several cameoing panels added to the door skins by Don and Bert.