


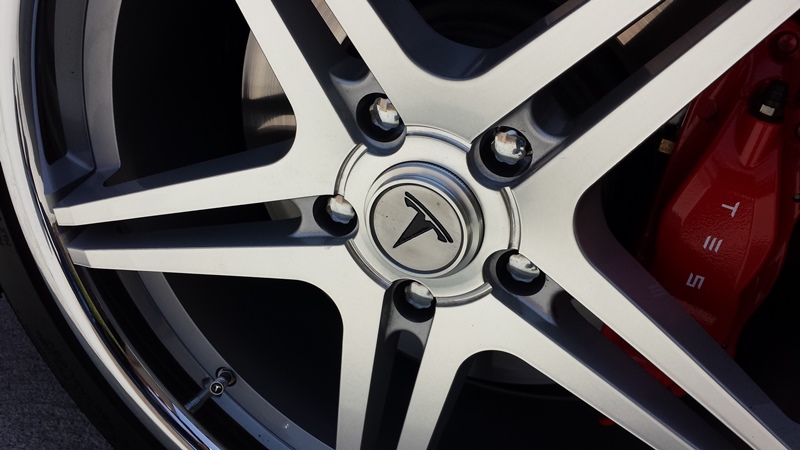
I ordered new wheels for my P85D - My stock Tesla center caps would not fit the new caps because the rear are deep set wheels and the cap needed to be deeper than stock. So - I ordered a set of self stick Tesla caps online. While they were of very nice quality, I thought, why not make my own out of aluminum. So, after doing a little research, this is what I came up with. I summarized my steps below for anyone else so inclined to make their own (do so at your own risk - this is merely how I made mine).
You will need:
Vinyl printer or see dscription for alternatives
Aluminum disks that fit the center cap
Small piece of scrap galvanized steel
Small plastic container large enough to hold twice the width of your disk
Power supply - some people use battery chargers, I found an old laptop charger capable of 5vdc-3A output
Alligator clips
An Amp meter to measure your amperage (not necessary, but safe)
Iodized salt
Water - I used distilled water
A well ventilated area.
(1) I purchased a set of aluminum disks 2" round from Ebay. This happened to be the exact diameter of the cap I wanted covered. [Ebay Link] - $11.50 incl shipping for 8 of them.
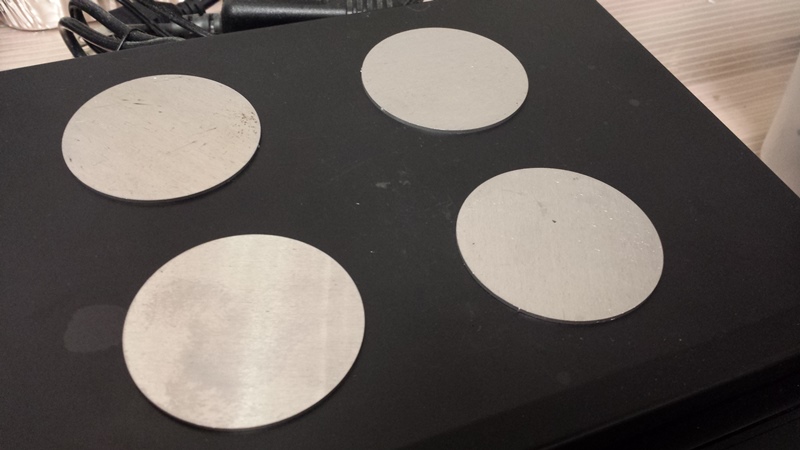
Note: Although I only needed to etch 4 of them, after I finished my etchings, I used epoxy to glue the extras to the etched ones because they were a little on the thin side.
(2) I printed out a Tesla logo on my vinyl printer (1.75" in height). If you don't have a vinyl printer, you could find a Tesla decal or sticker and apply it to the disk then use something like nail polish to paint the entire disk around it. Finally, just peel off the decal. The point here is you want to leave the logo part exposed aluminum since that is the part you want etched.
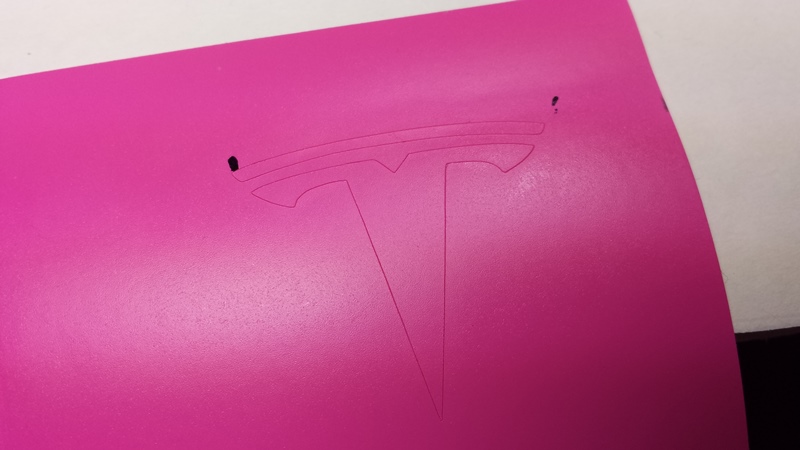
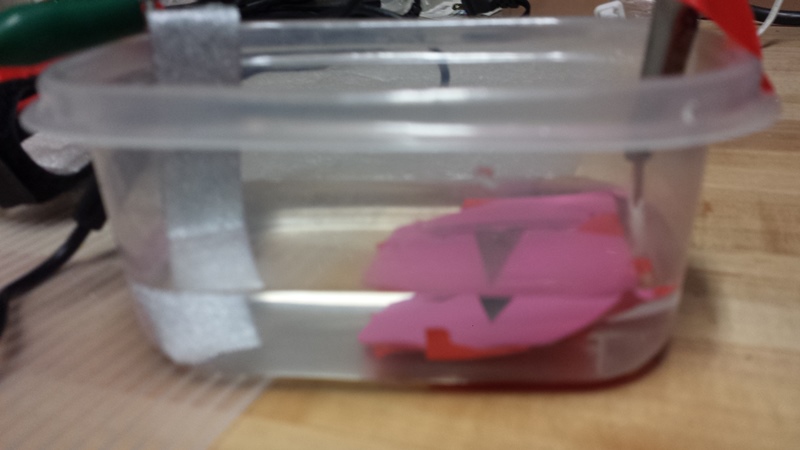
(3) I cleaned a set of 4 aluminum disks with steel wool and an alcohol cloth and adhered the vinyl to each. I then peeled out the Telsa log as this was the part I wanted to etch. I attached a piece of thick copper wire to the bottom of the disk so the copper was in full contact with the aluminum. Make sure you keep the insulation on the copper wire (except for the part making contact with the aluminum). If you don't do this, the etching process will etch away the exposed copper. I used electrical tape to hold it in place. I covered the entire disk in electrical tape (except for the logo). Any part of the aluminum not covered will be etched so be sure to cover every part of it tightly with electrical tape. Though I used electrical tape because it was handy, pretty much any water resistant material can be used - nail polish, paint, paint pens, Sharpie pen, circuit board resist products, etc..
Sorry I lost the picture showing this part but you can get the idea from this picture:
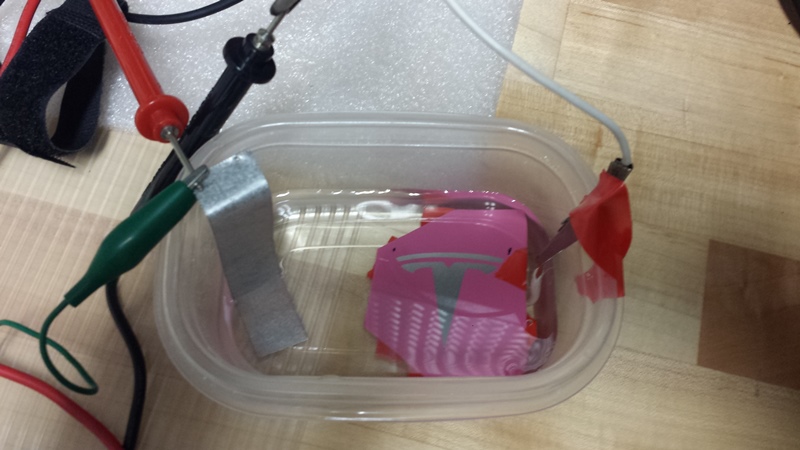
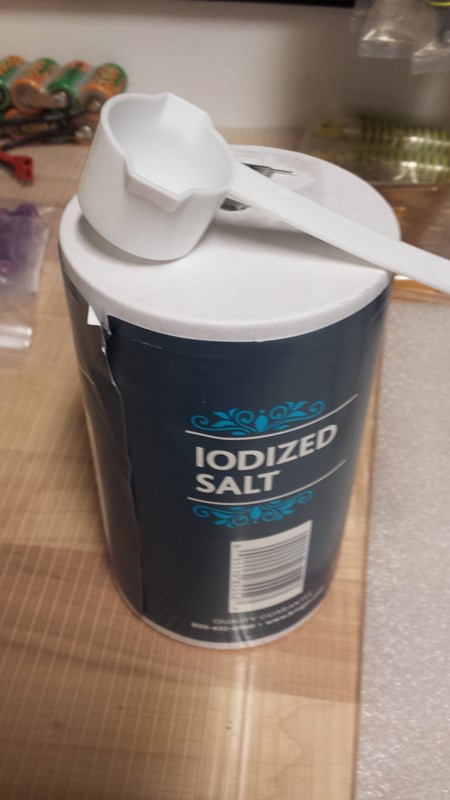
(4) I filled the plastic container with distilled water enough to cover the entire disk. Make sure the copper wire you attached to the disk isn't exposed under the water (this is why you should leave the insulation on it). I then added two small scoops of iodized salt to the water and agitated it so the salt dissolved as much as possible.
(5) MAKE SURE THE POWER SUPPLY IS NOT PLUGGED IN UNTIL THE END.
Typically, you would attach the negative side of the power supply to the small scrap of galvanized steel and the positive side to the copper wiser holding the aluminum disk to be etched. In my case, I wanted to make sure I didn't go way over the output amps (when you add more salt, the amps increase). So, I put an amp meter on the negative side (the negative of the power supply - to the positive side of the amp meter - the negative side of the amp meter to the scrap piece of galvanized steel). I then submerged the scrap piece of galvanized steel and the disk in the water. The must not touch each other and have some distance between them.

(6) I plugged in the power supply and noted the amps slowly flew by the 3A rated output (at one point reaching 7.5 amps) but the power supply never got hot so I left it this way since I knew the amperage would begin coming back down. BTW - the power supply was plugged into a power strip with a circuit breaker (just in case).
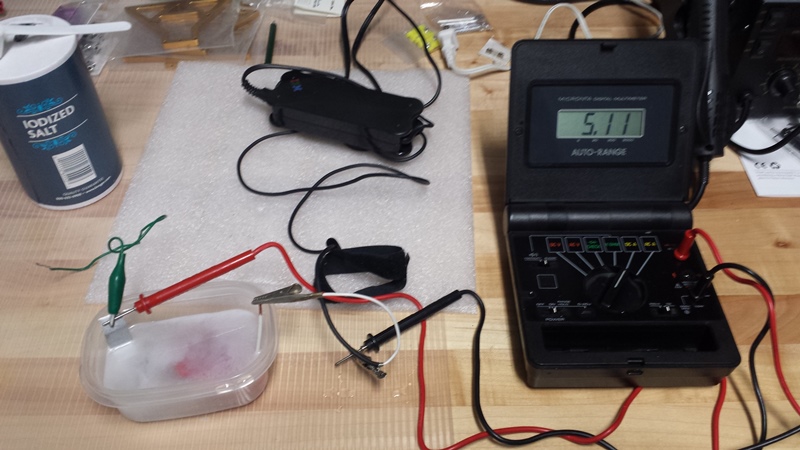
(7) If you hooked this up properly you will see the scrap galvanized steel fizzling under the water. (if the disk is fizzling then your polarity is wrong). Over time the water will become murky gray from the metal being etched. I left it this way for 18 minutes. Be careful not to breathe the small amount of fumes coming from the scrap metal. Do this in a well ventilated area.
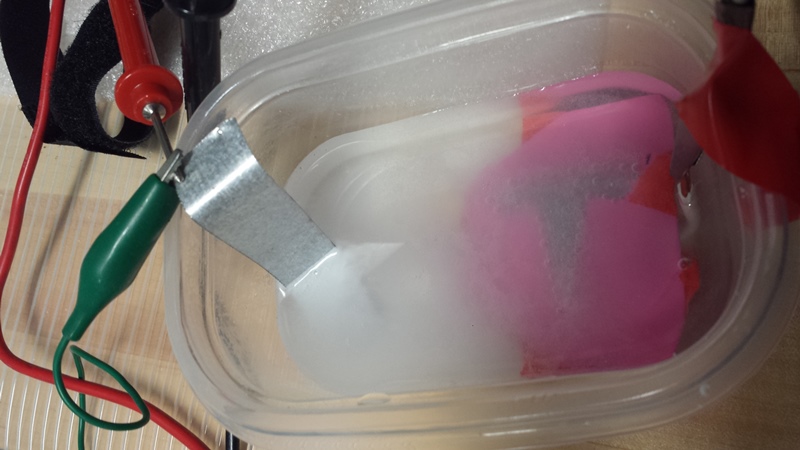
(8) After 18 minutes - I unplugged the power supply (the Amps slowly degraded to less than an Amp by this point). The longer you leave the disk in, the more it will etch - but you may have to add more salt to the water to keep the Amps up. After unplugging the power supply I took the disk out and unraveled all the electrical tape. I cleaned up the disk surface with steel wool.
(9) I followed the same procedure for each of the remaining disks
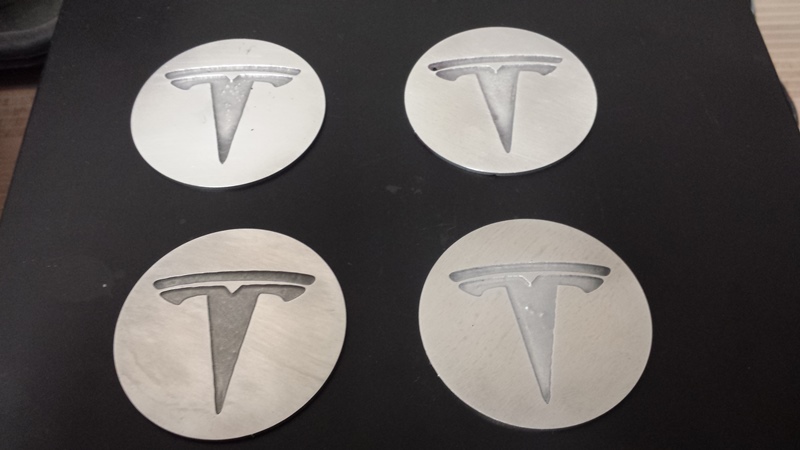
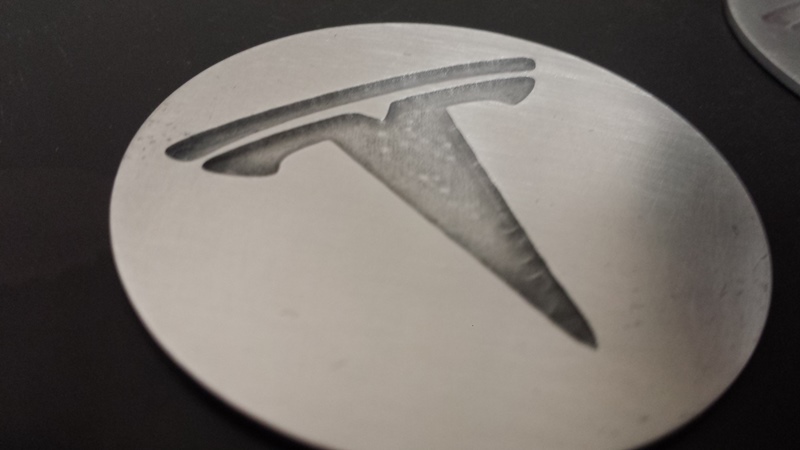
(10) I painted in all the logos with black paint. You don't need to be super careful with this. I used emery cloth to clean off any excess paint outside the etched area. I used steel wool to clean up the exposed aluminum and I applied several coats of clear coat.
As I mentioned earlier, I epoxied another disk behind this one to make it a little thicker. THen I epoxied the final piece to the plastic OEM piece on the center cap.
You will need:
Vinyl printer or see dscription for alternatives
Aluminum disks that fit the center cap
Small piece of scrap galvanized steel
Small plastic container large enough to hold twice the width of your disk
Power supply - some people use battery chargers, I found an old laptop charger capable of 5vdc-3A output
Alligator clips
An Amp meter to measure your amperage (not necessary, but safe)
Iodized salt
Water - I used distilled water
A well ventilated area.
(1) I purchased a set of aluminum disks 2" round from Ebay. This happened to be the exact diameter of the cap I wanted covered. [Ebay Link] - $11.50 incl shipping for 8 of them.
Note: Although I only needed to etch 4 of them, after I finished my etchings, I used epoxy to glue the extras to the etched ones because they were a little on the thin side.
(2) I printed out a Tesla logo on my vinyl printer (1.75" in height). If you don't have a vinyl printer, you could find a Tesla decal or sticker and apply it to the disk then use something like nail polish to paint the entire disk around it. Finally, just peel off the decal. The point here is you want to leave the logo part exposed aluminum since that is the part you want etched.
(3) I cleaned a set of 4 aluminum disks with steel wool and an alcohol cloth and adhered the vinyl to each. I then peeled out the Telsa log as this was the part I wanted to etch. I attached a piece of thick copper wire to the bottom of the disk so the copper was in full contact with the aluminum. Make sure you keep the insulation on the copper wire (except for the part making contact with the aluminum). If you don't do this, the etching process will etch away the exposed copper. I used electrical tape to hold it in place. I covered the entire disk in electrical tape (except for the logo). Any part of the aluminum not covered will be etched so be sure to cover every part of it tightly with electrical tape. Though I used electrical tape because it was handy, pretty much any water resistant material can be used - nail polish, paint, paint pens, Sharpie pen, circuit board resist products, etc..
Sorry I lost the picture showing this part but you can get the idea from this picture:
(4) I filled the plastic container with distilled water enough to cover the entire disk. Make sure the copper wire you attached to the disk isn't exposed under the water (this is why you should leave the insulation on it). I then added two small scoops of iodized salt to the water and agitated it so the salt dissolved as much as possible.
(5) MAKE SURE THE POWER SUPPLY IS NOT PLUGGED IN UNTIL THE END.
Typically, you would attach the negative side of the power supply to the small scrap of galvanized steel and the positive side to the copper wiser holding the aluminum disk to be etched. In my case, I wanted to make sure I didn't go way over the output amps (when you add more salt, the amps increase). So, I put an amp meter on the negative side (the negative of the power supply - to the positive side of the amp meter - the negative side of the amp meter to the scrap piece of galvanized steel). I then submerged the scrap piece of galvanized steel and the disk in the water. The must not touch each other and have some distance between them.
(6) I plugged in the power supply and noted the amps slowly flew by the 3A rated output (at one point reaching 7.5 amps) but the power supply never got hot so I left it this way since I knew the amperage would begin coming back down. BTW - the power supply was plugged into a power strip with a circuit breaker (just in case).
(7) If you hooked this up properly you will see the scrap galvanized steel fizzling under the water. (if the disk is fizzling then your polarity is wrong). Over time the water will become murky gray from the metal being etched. I left it this way for 18 minutes. Be careful not to breathe the small amount of fumes coming from the scrap metal. Do this in a well ventilated area.
(8) After 18 minutes - I unplugged the power supply (the Amps slowly degraded to less than an Amp by this point). The longer you leave the disk in, the more it will etch - but you may have to add more salt to the water to keep the Amps up. After unplugging the power supply I took the disk out and unraveled all the electrical tape. I cleaned up the disk surface with steel wool.
(9) I followed the same procedure for each of the remaining disks
(10) I painted in all the logos with black paint. You don't need to be super careful with this. I used emery cloth to clean off any excess paint outside the etched area. I used steel wool to clean up the exposed aluminum and I applied several coats of clear coat.
As I mentioned earlier, I epoxied another disk behind this one to make it a little thicker. THen I epoxied the final piece to the plastic OEM piece on the center cap.
