Welcome to Tesla Motors Club
Discuss Tesla's Model S, Model 3, Model X, Model Y, Cybertruck, Roadster and More.
Register

How to Replace the Tesla Model S Headlight Bulb (Non-Tech Pkg)

This site may earn commission on affiliate links.
How to Replace the Tesla Model S Halogen Headlight Bulb (Non-Tech Pkg)

I guess I've got one of the rare Model S cars that has no tech package. The headlight bulbs for these cars are the 9005 type (HB3 12V 65W). The only instructions I came across for replace the bulbs on the these cars was slim so here's my attempt to fill the void. I went ahead and tackled this with my typical "how hard can it be" mentality. I got the job done but my goodness, REALLY Tesla?!? I've got to replace a bulb through the wheel well? The maintenance ergonomics were not well thought out and I felt like crushing the little push-in fasteners at the end.

Tools/Items Used:
  • Sylvania XtraVision 9005 Halogen bulb (Appears comparable to the OEM Philips bulb that was in my car)
  • 1.5mm Allen wrench
  • 2.0mm flat head screwdriver
  • Uncut fingernails, preferably the thumb :O
  • Bucket-load of patience since this method doesn't involve taking the wheel off

Instructions:
  1. Raise the suspension to Very High
  2. Turn the tire all the way to the side of the headlight bulb your replacing. This will give you the most room to work with.
  3. Enable Jack mode in the suspension menu
  4. Open the frunk
  5. Take off the frunk trim piece closest to the fender, by unscrewing the bolt with a rubber head and lifting the trim piece out. See the images below for the red areas where there are clips secured by adhesive to the fender (another bad design choice) and other green locations where the trim tabs are slotted into to keep it from moving around
    IMG_20151107_181259_900x1200.jpg

    IMG_20151107_181323_900x1200.jpg

    IMG_20151107_181349_900x1200.jpg
  6. Pop out all the push-in fasteners closest to the headlight in the wheel well and the one underneath the bumper. In my car there were 3 long fasteners and a bunch of small fasteners. I don't remember the number of small fasteners. This is the step where I had to use my fingernails, screwdriver, and Allen wrench to wiggle some of the fasteners out. These fasteners are great when new but once dirt gets in they are a pain to operate. See the image below for the location of the long fasteners.
    IMG_20151107_161131_900x1200.jpg

    IMG_20151107_161624_900x1200.jpg

    IMG_20151107_161421_900x1200.jpg

    IMG_20151107_145957_1600x1200.jpg
  7. Bend back the wheel well cover to get access to the headlight. Slowly flex the bumper toward you as you bend the wheel well cover towards the wheel. There are areas where the wheel well cover can get snagged so slowly guide your hand around the wheel well as your bending the wheel well cover towards the wheel.
    IMG_20151107_161322_900x1200.jpg
  8. Bend back the next protective covering. It's lighter than the wheel well cover and bends easily.
    IMG_20151107_162007_900x1200.jpg
  9. Pull off the rubber seal for the headlight bulb
    IMG_20151107_162151_900x1200.jpg
  10. Twist the existing bulb counter-clockwise to unlock it, pull it out, and unhook the wire it's attached to.
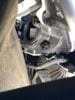
  11. Replace the bulb following the opposite of the previous step in the instructions. DO NOT TOUCH the bulb with your hands or get dirt on the bulb. Doing so will result in the bulb failing prematurely. Some wear gloves, I just carefully put the bulb in try to touch as little as possible. The approach that worked the best for me was to put the bulb in from the wheel well but to twist the bulb in I put my hand through the frunk area. The angling was better that way to get the bulb properly seated into the headlight housing. See the image below for how the headlight housing looks (up in the picture is up on the car)
    IMG_20151107_172600_1600x1200.jpg
  12. Turn on the headlights to make sure it works.
  13. Clean out the dirt in the fasteners and exercise their operation by opening them fully and closing them
  14. Replace all the wonderful fasteners, bolts, rubber seal, and trim. Enjoy!

Additional picture of the headlight housing:
IMG_20151107_163734_1600x1200.jpg
 
Last edited:
How to Replace the Tesla Model S Halogen Headlight Bulb (Non-Tech Pkg)

I guess I've got one of the rare Model S cars that has no tech package. The headlight bulbs for these cars are the 9005 type (HB3 12V 65W). The only instructions I came across for replace the bulbs on the these cars was slim so here's my attempt to fill the void. I went ahead and tackled this with my typical "how hard can it be" mentality. I got the job done but my goodness, REALLY Tesla?!? I've got to replace a bulb through the wheel well? The maintenance ergonomics were not well thought out and I felt like crushing the little push-in fasteners at the end.

For what it's worth, many cars nowadays have headlamps changed through the wheel well. My 2010 Traverse has the same "feature" (said with a few cursewords).
 
I was thinking about ordering these and trying... the dimensions are pretty close but it is a little long. I would be afraid of putting the ballast too close to the plastic and melting it or causing a fire. Could this be done with the size discrepancy?

This link has the sizes for the LED LED Headlight Kit - 9005 LED Headlight Bulbs Conversion Kit with Built In Fan | High Beam and Low Beam Headlight Bulb | Front Exterior LED Bulbs | LED Lights | Super Bright LEDs

And this link has sizes for a hallogen 9005 http://www.perdeauto.com/images/9005-65-BX2_specs.jpg
 
I was thinking about ordering these and trying... the dimensions are pretty close but it is a little long.
I would be afraid of putting the ballast too close to the plastic and melting it or causing a fire. Could this be done with the size discrepancy?

This link has the sizes for the LED LED Headlight Kit - 9005 LED Headlight Bulbs Conversion Kit with Built In Fan | High Beam and Low Beam Headlight Bulb | Front Exterior LED Bulbs | LED Lights | Super Bright LEDs
And this link has sizes for a hallogen 9005 http://www.perdeauto.com/images/9005-65-BX2_specs.jpg

I have done a number of LED retrofits in other cars and the bulb base is a bit larger, however the LED is much lower temperature than the Halogen.
The only way to really check the bulb size for sure is to do a test fit on your Model S and locate the LED and ballast in the fender well area. Good luck!
 
I'm glad people found this how-to useful.

Thanks for the HID suggestion. Maybe I'll tackle that next year. There are other projects I want to do first.
What are the downsides to the HID conversion?

With a good quality HID conversion kit the only downside is cost ... $50 for the kit vs. $15 for halogen bulbs.
The HID upside has many benefits:

- Longer life LED bulbs (2000 hrs vs. 500hrs)
- Lower wattage draw (35W vs. 55W)
- Higher light output (3500 lumens vs. 1200)
- Higher white light color temp (5000 vs. 3500)
 
  • Like
Reactions: NoirMS
Thanks Loganss for pioneering the way here. Just changed my non-tech MS60 (S11063) halogens. In a pinch I had to buy NAPA version LMP 9005's (high beam), which are made in china as opposed to the OEMs phillips bulbs made in Germany. Tesla uses the high beam spec bulb and does 2-levels of voltage through them to get the high/low beam effect.

I used a low profile jack to quickly remove the wheel. Then I slid the wheel on its side under the frame/body just forward of the wheel well. This safety measure prevents the car from crushing me should the jack fail while. As others have pointed out, there isn't a great way to get a jack stand under the car so far as I know. I found with the wheel removed, the body fasteners where relatively quick and easy to get out. A flat head screw driver and ratcheting wrench (think it was 10mm) was all that was needed.

One puzzling observation: Two of us, plus the steering wheel digital display showed the driver's side headlamp not illuminated prior to my fix. I changed the driver side bulb only to find the passenger side wasn't working. I hadn't even removed the car from the jack! It's impossible this is coincidence. And, I'm VERY sure we didn't make a mistake on which side to change as we replayed the scenario of what bulb was out several times and I recall it being the side closest to oncoming traffic was not lit. It seemed as though the car was somehow aware I changed only one bulb, or aware of an amperage difference between the two sides. So, back to NAPA, removed wheel 2, and replaced bulb 2. Everything now works fine!
 
  • Like
Reactions: loganss
I always change paired bulbs at the same time anyway. I personally can't stand to see a car with two "shades" or brightnesses in their headlights or taillights, so I just do them both. Invariably the other one would have failed soon enough anyways.
 
Thanks for the write up. I'm stuck at this point. Not sure how to remove the old bulb. It won't budge counter-clockwise and I don't want to break anything. Any ideas?
 

Attachments

  • IMG_7470.JPG
    IMG_7470.JPG
    415.4 KB · Views: 297
Thanks for the write up. I'm stuck at this point. Not sure how to remove the old bulb. It won't budge counter-clockwise and I don't want to break anything. Any ideas?

I did this again a few weeks ago. This might sound silly but try to jiggle the bulb back and forth a little bit then try again to twist counter clockwise.

You might also want to take a pic of what the bulb looks like in there to help ingrain a picture in your head of the optimal path the bulb would need to be turned before coming out of the housing and to check that everything looks good in there.

If all else fails you could go the route of removing the entire bumper. That makes things a lot easier for changing the bulbs. Just got to be careful of the wiring harness. Another forum member posted a tutorial on how to remove the bumper.

Here's the other thread about bumper removal:
How To: Front Bumper and Headlight Removal

I used it to replace my one fog light. I ran into an issue with my car and a stuck clip holding the bumper to the fender on one side. I'll have to just get service to take care of that next visit.
 
Last edited:
527036652.533164.jpg
Ok, so it was getting too difficult to see what my problem was so I took off the wheel. Way easier to angle once I did. I didn't know there was a black C-shaped locking collar. Once I knew where to twist it was pretty straightforward, though quite a tight fit for bigger hands. I didn't use the access from the frunk as that angle was too severe for me, so some may find success just entering through the wheel well.