I'm sure everyone is aware of the common problem of peeling headlights lenses that affects our cars, and I'm also sure everyone is aware of how massively expensive these crazy things are to replace...
So anyway, my 2010 roadster had one of its peeling headlights replaced by the previous owner, and he kept the headlight that was removed. It was included with the car when I bought it, so I had an extra headlight to experiment with. I stupidly didn't take a "before" photo, but let's just say over 40% of the lens had peeled. The remaining original headlight on the car is now peeling, so I figured I'd take a shot at restoring it and see if perhaps I could re-use it.
I ordered a 3M kit from Amazon as seen in the following link, and used it with an $18 electric drill I picked up from Lowes:
Amazon.com: 3M 39008 Headlight Lens Restoration System: Automotive
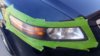
The kit contains sanding discs of varying grit, and the first (coarsest) pass is definitely the most time consuming. You have to watch closely as you grind away the existing UV coating from the lens, and you can quite clearly see the areas you've removed it all from, and the areas you still need to work on. There's a definitely color difference you can see as you're sanding away with the first disc. The remaining discs of finer grit are much quicker and easier to use. Anyway, below is a link to a gallery with some photos from the process.
You can see that the final result is pretty damn good, although I'm anal and will admit it's not as good as I would have liked. I can still see some areas of haziness or fine scratches, despite many passes with the finer grit discs. But in any case, the peeling is 100% gone and from a distance the lens probably looks like new. I'm going to experiment with some LaminX film as a replacement UV protection layer, and I'm hoping the adhesive on the film may help mask the blemishes that bug me. If not, I may try to pick up a different rubbing compound to see if I can clean it up a little bit more, and then have an automotive shop paint spray on some new UV protectant.
So that was tonight's adventure. Make of it what you will.")
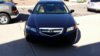
BTW: The final images in the gallery show the restored lens next to a non-restored lens in an attempt to give a comparison of the lens clarity.
Tesla Roadster Headlight Restoration - Album on Imgur
So anyway, my 2010 roadster had one of its peeling headlights replaced by the previous owner, and he kept the headlight that was removed. It was included with the car when I bought it, so I had an extra headlight to experiment with. I stupidly didn't take a "before" photo, but let's just say over 40% of the lens had peeled. The remaining original headlight on the car is now peeling, so I figured I'd take a shot at restoring it and see if perhaps I could re-use it.
I ordered a 3M kit from Amazon as seen in the following link, and used it with an $18 electric drill I picked up from Lowes:
Amazon.com: 3M 39008 Headlight Lens Restoration System: Automotive
The kit contains sanding discs of varying grit, and the first (coarsest) pass is definitely the most time consuming. You have to watch closely as you grind away the existing UV coating from the lens, and you can quite clearly see the areas you've removed it all from, and the areas you still need to work on. There's a definitely color difference you can see as you're sanding away with the first disc. The remaining discs of finer grit are much quicker and easier to use. Anyway, below is a link to a gallery with some photos from the process.
You can see that the final result is pretty damn good, although I'm anal and will admit it's not as good as I would have liked. I can still see some areas of haziness or fine scratches, despite many passes with the finer grit discs. But in any case, the peeling is 100% gone and from a distance the lens probably looks like new. I'm going to experiment with some LaminX film as a replacement UV protection layer, and I'm hoping the adhesive on the film may help mask the blemishes that bug me. If not, I may try to pick up a different rubbing compound to see if I can clean it up a little bit more, and then have an automotive shop paint spray on some new UV protectant.
So that was tonight's adventure. Make of it what you will.
BTW: The final images in the gallery show the restored lens next to a non-restored lens in an attempt to give a comparison of the lens clarity.
Tesla Roadster Headlight Restoration - Album on Imgur