I have been reading the threads on fixes for the moving and flapping floor mats but did not find anything that I thought would work for me. I looked at some of the aftermarket floor mats folks recommended and while they seem to be of better quality and come in different colors I also read that they would still move around and the passenger mat still flaps when hitting the accelerator in some peoples experience.
I found a fix. You will need a pair of nail scissors and some sort of tool to pinch a hole into a carpet. In addition you will need these:
http://www.ecstuning.com/ES348762/
http://www.ecstuning.com/ES348755/
I had them in a previous live when I was driving a VW Golf. These clips keep the floor mats in place, period.
Here is how to install them. It took me about 20 min to prepare the floor mats and to install them in the car.
1. Mark the spot you want to install the clip (use the lower part of the hole clip as a template) and cut off the little nipples adjacent to the hole.
2. Cut out the hole. Cut about 3 mm outside the lines.
3. Turn mat over and remove some of the shag surrounding the hole using the nail scissors.
4. Insert the top and
5. the bottom of the two piece assembly. I placed the mat onto the floor and stepped on it with my heel to make the assembly snap.
6. Installation in the car: Use a sharp tool to pinch a hole into the carpet below the floor mat. This is easy next to the doors, more difficult closer to the center console. There make sure to use the tool to lift up the carpet to make it easier to screw in the screws.
7. Once screwed in, place floor mat on top and fasten by turning the clip 90 degrees. The floor mat will now be secured.
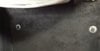
8. We have all seen it. This is what the passenger floor mat looks like after hitting the accelerator. It flaps over and now sits on my passengers feet.
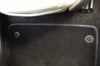
9. I placed a floor mat screw right at the top of the mat. This will never fold over again. In addition, I placed two screws on the two corners of the driver side mat close to the drivers seat and the fourth screw on the passenger side just below the right edge of the seat. That should do it.
Thanks VW/Audi for making the floor mat screws.
I found a fix. You will need a pair of nail scissors and some sort of tool to pinch a hole into a carpet. In addition you will need these:
http://www.ecstuning.com/ES348762/
http://www.ecstuning.com/ES348755/
I had them in a previous live when I was driving a VW Golf. These clips keep the floor mats in place, period.
Here is how to install them. It took me about 20 min to prepare the floor mats and to install them in the car.
1. Mark the spot you want to install the clip (use the lower part of the hole clip as a template) and cut off the little nipples adjacent to the hole.
2. Cut out the hole. Cut about 3 mm outside the lines.
3. Turn mat over and remove some of the shag surrounding the hole using the nail scissors.
4. Insert the top and
5. the bottom of the two piece assembly. I placed the mat onto the floor and stepped on it with my heel to make the assembly snap.
6. Installation in the car: Use a sharp tool to pinch a hole into the carpet below the floor mat. This is easy next to the doors, more difficult closer to the center console. There make sure to use the tool to lift up the carpet to make it easier to screw in the screws.
7. Once screwed in, place floor mat on top and fasten by turning the clip 90 degrees. The floor mat will now be secured.
8. We have all seen it. This is what the passenger floor mat looks like after hitting the accelerator. It flaps over and now sits on my passengers feet.
9. I placed a floor mat screw right at the top of the mat. This will never fold over again. In addition, I placed two screws on the two corners of the driver side mat close to the drivers seat and the fourth screw on the passenger side just below the right edge of the seat. That should do it.
Thanks VW/Audi for making the floor mat screws.
Attachments

Last edited: