We all know that the Model S is the most advanced sedan. How would you like to have a DashCam? I recently saw that people in Russia and Europe use their smartphones to record what is going on in front of your car while driving. It came in very handy a few months back when all the news agencies got video of the Meteors crashing into the Russian towns. Also you would have evidence of a crash if someone cuts you off or in some other ways causes an accident. Thinking about this the cost to add it to the car should be almost minimal, a small video camera, like already exists in the rear, and some cheap memory for a 15 minute loop in the computer system. If available I think it would be something many people would appreciate. Thoughts?


Welcome to Tesla Motors Club
Discuss Tesla's Model S, Model 3, Model X, Model Y, Cybertruck, Roadster and More.
Register
Install the app
How to install the app on iOS
You can install our site as a web app on your iOS device by utilizing the Add to Home Screen feature in Safari. Please see this thread for more details on this.
Note: This feature may not be available in some browsers.
-
Want to remove ads? Register an account and login to see fewer ads, and become a Supporting Member to remove almost all ads.
You are using an out of date browser. It may not display this or other websites correctly.
You should upgrade or use an alternative browser.
You should upgrade or use an alternative browser.
Laumb
smrtass.
Im getting the Blackvue DR-500. Look it up, there are threads about this, and some even installed it In their S.
Im am sure your topic is about a integrated dash cam - i would agree that would be cool too!
Im am sure your topic is about a integrated dash cam - i would agree that would be cool too!
jayfrost
Member
There is a great discussion over at Tesla forums.
Dashboard Camera Install | Forums | Tesla Motors
I installed mine using the method described in the post. I made and an adaptor that plugged into the extra jack that is located near the microphone in the ceiling console. Ran the power cord thru the liner and it preforms awesomely.
Jason
Sent from my SCH-I605 using Tapatalk 2
Attachments
There is a great discussion over at Tesla forums.
Dashboard Camera Install | Forums | Tesla Motors
I installed mine using the method described in the post. I made and an adaptor that plugged into the extra jack that is located near the microphone in the ceiling console. Ran the power cord thru the liner and it preforms awesomely.
Jason
Sent from my SCH-I605 using Tapatalk 2
Thanks Jason, this is exactly what I was looking for. BTW the guy that started the thread said the Tesla Service Center where I am located installed it for him, so that is what I will do. Here is the exact thread as it took awhile for me to find it on the TM website
http://www.teslamotors.com/forum/forums/dashboard-camera-install
markb1
Active Member
I installed mine using the method described in the post. I made and an adaptor that plugged into the extra jack that is located near the microphone in the ceiling console. Ran the power cord thru the liner and it preforms awesomely.
How did you route it under the liner? I was looking under the mic cover, and I didn't see a way through.
jayfrost
Member
If you have a snake you can enter the liner about 5 inches to the right of the mirror. Push gently till you see it in the microphone area. It can be done, just take ur time. Good luck.
J
Sent from my SCH-I605 using Tapatalk 2
J
Sent from my SCH-I605 using Tapatalk 2
markb1
Active Member
If you have a snake you can enter the liner about 5 inches to the right of the mirror. Push gently till you see it in the microphone area. It can be done, just take ur time. Good luck.
Thanks for the tip! I just now managed to fish it using a long cable tie. I couldn't get it through going up from the window, but it was quite easy going down from the mic area, aiming toward the location you mentioned.
jayfrost
Member
Congrats on the install! Enjoy the Cam. Its a great add-on.
J
Sent from my SCH-I605 using Tapatalk 2
J
Sent from my SCH-I605 using Tapatalk 2
blaz
Member
BTW the guy that started the thread said the Tesla Service Center where I am located installed it for him, so that is what I will do.
I also read that thread and called the LA Service Center to ask if they could install the dashcam for me (same camera here, BlackVue DR-500), but they said they couldn't really do it since it wasn't an official Tesla accessory, but they would gladly give me any information I'd need to do it. In the end I just did it myself and it was pretty simple. Without removing any panels you can route the cable pretty well and hide it for the most part, making the whole install inconspicuous.
I'm really happy with this camera.
GasDoc
Member
I ordered mine yesterday. Looking forward to installing it.
Has anyone been able to find a source for the matching connector to the one found in the microphone grill? If not, how did you tap it, just put wires into the appropriate holes and wrap it up in electrical tape or heat shrink tubing?
Has anyone been able to find a source for the matching connector to the one found in the microphone grill? If not, how did you tap it, just put wires into the appropriate holes and wrap it up in electrical tape or heat shrink tubing?
jayfrost
Member
GasDoc,
I build a lot of model Helicopters and Planes and found that I was able to use a servo extension cable and hack it to work.
http://www.amazon.com/Waltzmart-300mm-Servo-Extension-Futaba/dp/B009NP42NY/ref=pd_sbs_op_10

There is a plastic cover surrounding the male side that you will need to remove. Simply cut the plastic off to expose the 3 male pins. You do not use the middle wire if you are using the jack next to the microphones. Next, I spliced the power adapter to the cable. Note that the cigarette adapter that comes with Black Vue cam has a 2amp fuse in it. I did pick up an inline fuse for this project from Radio Shack and built the cord that Alex K. created on the Tesla Forum.

You can pick up servo cables for a buck or two at any hobby shop.
I originally tried to build the part but Radio Shack was useless and the other computer part stores were closed. Hope this helps.
J
I build a lot of model Helicopters and Planes and found that I was able to use a servo extension cable and hack it to work.
http://www.amazon.com/Waltzmart-300mm-Servo-Extension-Futaba/dp/B009NP42NY/ref=pd_sbs_op_10
There is a plastic cover surrounding the male side that you will need to remove. Simply cut the plastic off to expose the 3 male pins. You do not use the middle wire if you are using the jack next to the microphones. Next, I spliced the power adapter to the cable. Note that the cigarette adapter that comes with Black Vue cam has a 2amp fuse in it. I did pick up an inline fuse for this project from Radio Shack and built the cord that Alex K. created on the Tesla Forum.
You can pick up servo cables for a buck or two at any hobby shop.
I originally tried to build the part but Radio Shack was useless and the other computer part stores were closed. Hope this helps.
J
Last edited:
4sevens.com
Member
PattyChuck
Model S P100D, Model X P90D
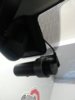
I know this has been discussed on the teslamotors.com forums, but I thought I would add my experience here. I installed an iTronics ITB-100HD dash cam in my S, and it took all of about 30 minutes (plus an additional 30 minutes driving in the ICE to go to the auto parts store and buy a fuse holder :crying") . I, as many have now done, also tapped in to the unused 12V connector under the microphone screen, but I also routed the cable under the headliner/rearview mirror plastic housing. Pictures and description of install follow thusly:
. I, as many have now done, also tapped in to the unused 12V connector under the microphone screen, but I also routed the cable under the headliner/rearview mirror plastic housing. Pictures and description of install follow thusly:
I didn't have any fancy male plug to use with the existing connector, but I found that if you pop the two small retaining clips on either side of the connector, it opens up to allow access to the metal leads. I simply laid my stripped wires on top of these leads and snapped the connector cover closed. A significant tug could not dislodge the wires from the connector, so I am confident this will suffice.


I routed the camera power cable thru the headliner and under the plastic housing for the rear view mirror. The plastic housing is held in place by the windshield moisture sensor. If you slide a plastic pry tool between the windshield and the housing, and bit of light pressure should get it to pop off the sensor. I ended up taking off the entire rear view mirror, but I think that was overkill.

Once the housing is "loose", there should be enough wiggle room to worm the power cable from the power source thru the headliner and under the housing.

If there's not enough room and you need to remove the housing, you can "split" it by gently prying it open. Be very careful! Some of the clips really did not want to come free, and I nearly broke one of them off. There are five clips that hold the two halves together. The picture here is the right half of the housing. For orientation, the bit that's closest to my ring finger is the part where the mirror goes.

I then just snapped it all back in to place. There was enough play in the fit of the housing that after everything was put back in place, I was still able to tug on either side of the power cable and get it to slide back and forth, making the final fit very easy. From the outside, you can barely notice the camera. From the drive seat, you can't see it at all, and from the passenger seat, you can barely see it. Pretty happy with the results! Thanks to several people on the forums here who inspired me to do this myself instead of paying my local car hacker $350 to do it for me!
Interior:

Driver side:

Pax Side:

Exterior:

. I, as many have now done, also tapped in to the unused 12V connector under the microphone screen, but I also routed the cable under the headliner/rearview mirror plastic housing. Pictures and description of install follow thusly:I didn't have any fancy male plug to use with the existing connector, but I found that if you pop the two small retaining clips on either side of the connector, it opens up to allow access to the metal leads. I simply laid my stripped wires on top of these leads and snapped the connector cover closed. A significant tug could not dislodge the wires from the connector, so I am confident this will suffice.
I routed the camera power cable thru the headliner and under the plastic housing for the rear view mirror. The plastic housing is held in place by the windshield moisture sensor. If you slide a plastic pry tool between the windshield and the housing, and bit of light pressure should get it to pop off the sensor. I ended up taking off the entire rear view mirror, but I think that was overkill.
Once the housing is "loose", there should be enough wiggle room to worm the power cable from the power source thru the headliner and under the housing.
If there's not enough room and you need to remove the housing, you can "split" it by gently prying it open. Be very careful! Some of the clips really did not want to come free, and I nearly broke one of them off. There are five clips that hold the two halves together. The picture here is the right half of the housing. For orientation, the bit that's closest to my ring finger is the part where the mirror goes.
I then just snapped it all back in to place. There was enough play in the fit of the housing that after everything was put back in place, I was still able to tug on either side of the power cable and get it to slide back and forth, making the final fit very easy. From the outside, you can barely notice the camera. From the drive seat, you can't see it at all, and from the passenger seat, you can barely see it. Pretty happy with the results! Thanks to several people on the forums here who inspired me to do this myself instead of paying my local car hacker $350 to do it for me!
Interior:
Driver side:
Pax Side:
Exterior:
Last edited:
Thank you all for the really nice descriptions and photos. I'm leaning towards @PattyChuck's method because I'm not very handy. I bought a Blackvue dash cam and would like to take advantage of the vacant 12V connector above, but I'm a complete noob when it comes to electrical mods.
I bought a 5x20mm inline fuse holder for my 2A fuse that was housed in the dash cam's cigarette lighter adaptor. Could someone detail the part about connecting the dash cam cable to the fuse holder?
TIA!
I bought a 5x20mm inline fuse holder for my 2A fuse that was housed in the dash cam's cigarette lighter adaptor. Could someone detail the part about connecting the dash cam cable to the fuse holder?
TIA!
araxara
X-LR M3AWD, MYLR
The pictures and descriptions here look pretty clear, but you could take a look at the discussion at Dashboard Camera Install | Forums | Tesla Motors, which may also help.Could someone detail the part about connecting the dash cam cable to the fuse holder?
The pictures and descriptions here look pretty clear, but you could take a look at the discussion at Dashboard Camera Install | Forums | Tesla Motors, which may also help.
Thanks araxara, I've been looking at that thread as well. I agree, everything that is shown is great. However, I was hoping someone could break down the fuse holder part since I've never used one before. I bought the suggested 5x20mm holder but the 2A fuse from the blackvue doesn't seem to fit in it. Do you have to push really hard, or hammer it in there? Clearly I'm doing something wrong
Also, do you crimp, solder, twist connect the fuse holder wire ends to the dash cam and 12V connector?
Sorry for the seriously newbie questions! :redface:
araxara
X-LR M3AWD, MYLR
The 5x20mm fuse holder should take a 5x20mm fuse. I'm not sure which BlackVue dashcam model you have, but the one I have did not have x 5x20mm fuse - it had a standard size one. That's probably why you can't get it to fit. You will need to get some 2A 5x20mm fuses (also available at Radio Shack). Since the the dashcam, draws allot less current you could go with a 1A fuse or less, but I decided to stick with what was in the 12V adapter. A 5x20mm fuse holder is used just because it's much smaller.Thanks araxara, I've been looking at that thread as well. I agree, everything that is shown is great. However, I was hoping someone could break down the fuse holder part since I've never used one before. I bought the suggested 5x20mm holder but the 2A fuse from the blackvue doesn't seem to fit in it. Do you have to push really hard, or hammer it in there? Clearly I'm doing something wrong
Also, do you crimp, solder, twist connect the fuse holder wire ends to the dash cam and 12V connector?
I ran the fuse holder inline with the dashcam power wire and soldered it in place and used heat shrinkable tubing. I suppose you could twist the wires and wrap them in electrical tape, but the dashcam power wire is rather thin. You can see the results of what I did in the above image (http://www.teslamotorsclub.com/attachment.php?attachmentid=20160&d=1366053725). I also soldered and heat shrink wrapped the power wires to the pin header that plugs into the power receptacle. There are other ways to connect to the power as illustrated above.
The 5x20mm fuse holder should take a 5x20mm fuse. I'm not sure which BlackVue dashcam model you have, but the one I have did not have x 5x20mm fuse - it had a standard size one. That's probably why you can't get it to fit. You will need to get some 2A 5x20mm fuses (also available at Radio Shack). Since the the dashcam, draws allot less current you could go with a 1A fuse or less, but I decided to stick with what was in the 12V adapter. A 5x20mm fuse holder is used just because it's much smaller.
I ran the fuse holder inline with the dashcam power wire and soldered it in place and used heat shrinkable tubing. I suppose you could twist the wires and wrap them in electrical tape, but the dashcam power wire is rather thin. You can see the results of what I did in the above image (http://www.teslamotorsclub.com/attachment.php?attachmentid=20160&d=1366053725). I also soldered and heat shrink wrapped the power wires to the pin header that plugs into the power receptacle. There are other ways to connect to the power as illustrated above.
Your modified cable looks really good! You're right, I do need a smaller 2A fuse. Everything else seems pretty doable. Thank you and @PattyChuck as well for breaking it down. I think I'm ready to get started!
Saw this
Lukas LK-7900 Ace | Dash Cam Talk
Thinking about doing this as well. Had never thought about anything like this until getting this car and seeing what people posted about them. Would love a factory option down the road (built in and concealed better).
Lukas LK-7900 Ace | Dash Cam Talk
Thinking about doing this as well. Had never thought about anything like this until getting this car and seeing what people posted about them. Would love a factory option down the road (built in and concealed better).
Similar threads
- Replies
- 3
- Views
- 1K
- Replies
- 23
- Views
- 2K
- Sticky
- Replies
- 46
- Views
- 24K
- Replies
- 5
- Views
- 2K